


Vegetable Gardening Like You’ve Never Seen Before
So far I’ve gone over and over how to take care of your plants and planters. Behind the scenes, my plants and planters are peanuts compared to my vegetable gardening. I think it’s time you got a lesson on how to grow and maintain your edible gardens.
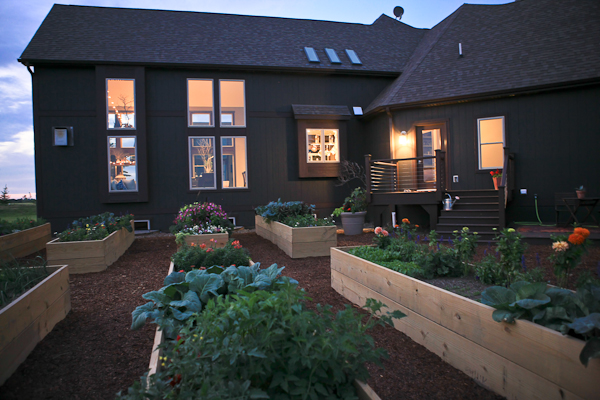
 For years, I’ve grown veggies in containers due to limited space and time. I was spoiled with having an all access pass to Farmer Wayne’s 3 acre Vegetable Garden. This year, I decided, was going to be my year to design and grow my own edible gardens. By this time, I already knew that I wanted to have a large amount of space dedicated to raised bed gardening, because I already mastered growing vegetables in contained spaces.
I also knew I wanted a very large ground bed for my Fall garden since the Fall season is one of my favorites here in Wisconsin.
Notonly is it my favorite because of the beautiful colors, but because of the pumpkins, gourds, indian corn, harvesting and of course, the heavier heartier meals. The Fall season brings such a warm feeling to all of us, especially me, growing up on  Loppnow Farms. When I was younger we had pick your own pumpkins, hayrides and caramel apples. Now, every time I’m in my Fall garden tilling and weeding, it brings such a good feeling knowing that I am going to provide that memorable feeling for my little girls as they grow up. If you want to learn more about Loppnow Farms history and what it has become today, read my About Me page.
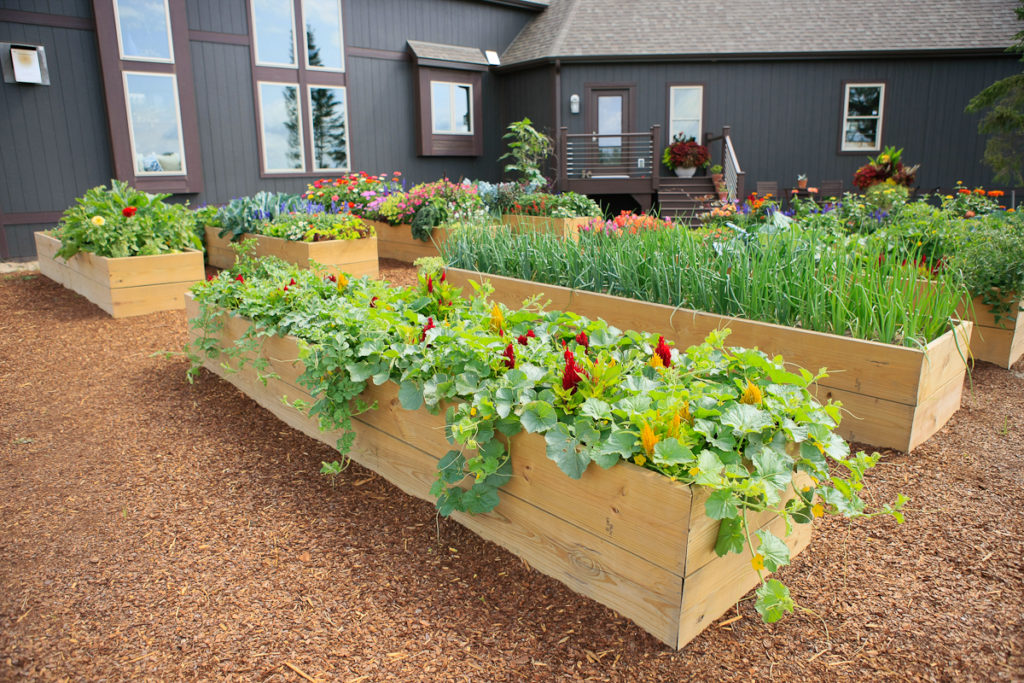
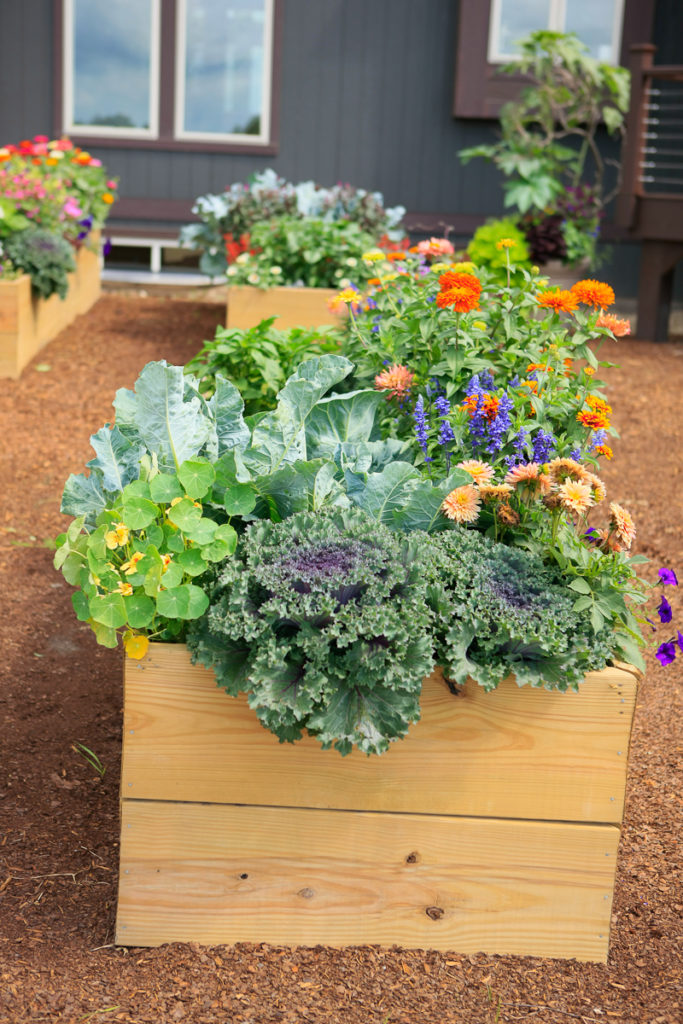
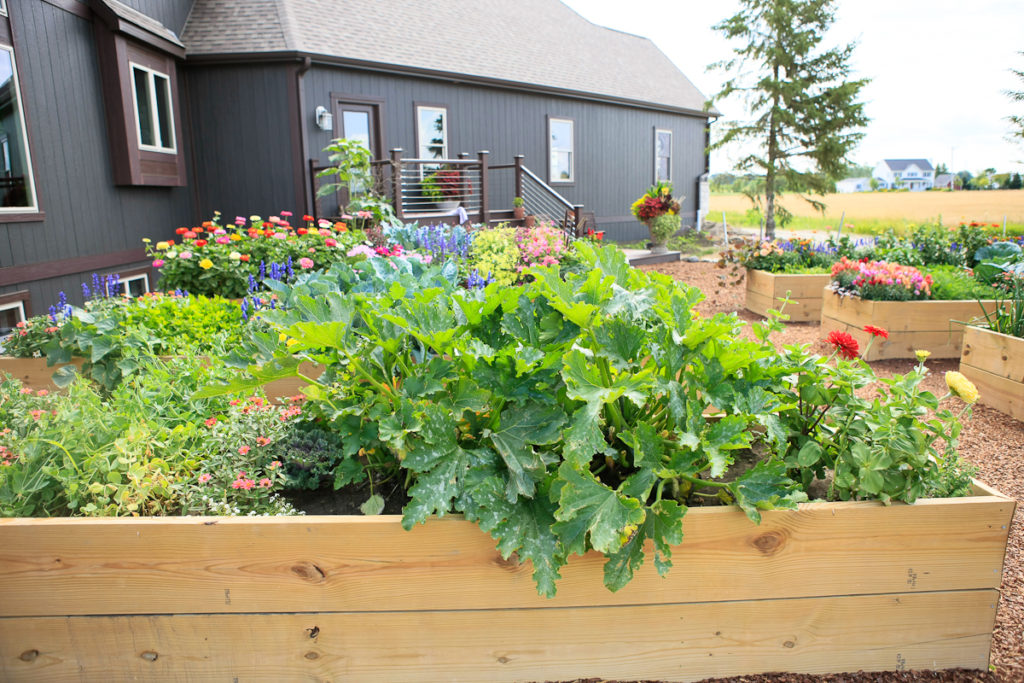
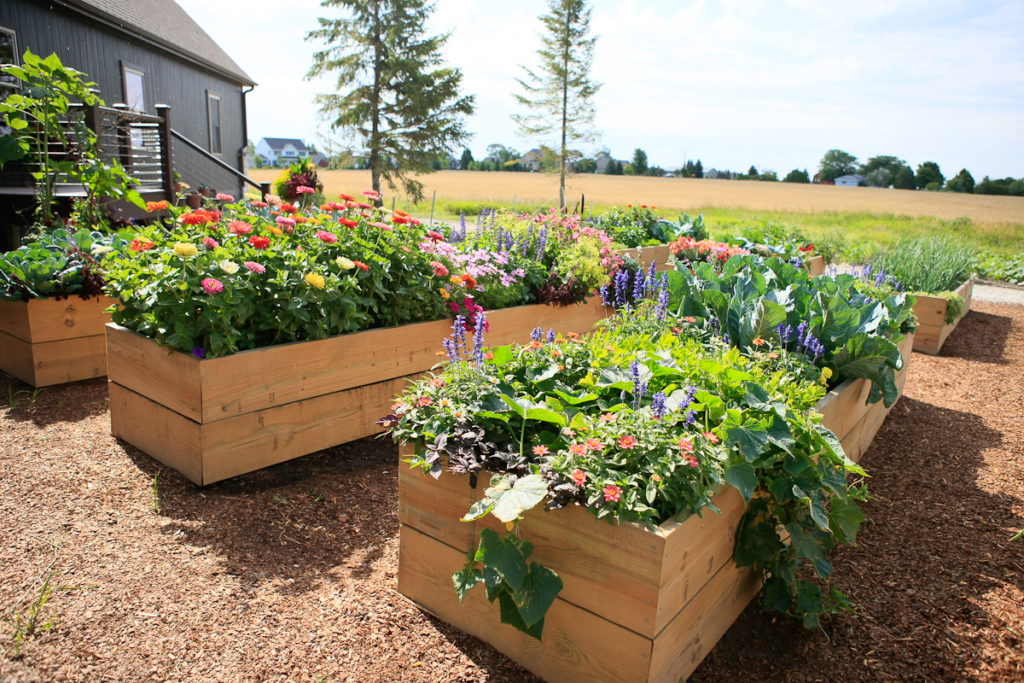 Lets start with my raised beds. As you can see, they aren’t your ordinary vegetable gardens. They are exploding with color. My raised beds are a huge part of who I am, different and definitely not boring. I intermix flowering annuals throughout all of my edibles. Here is your lesson. I will show and teach you everything I have done, and what I will continue to do in order to have successful raised bed gardens.
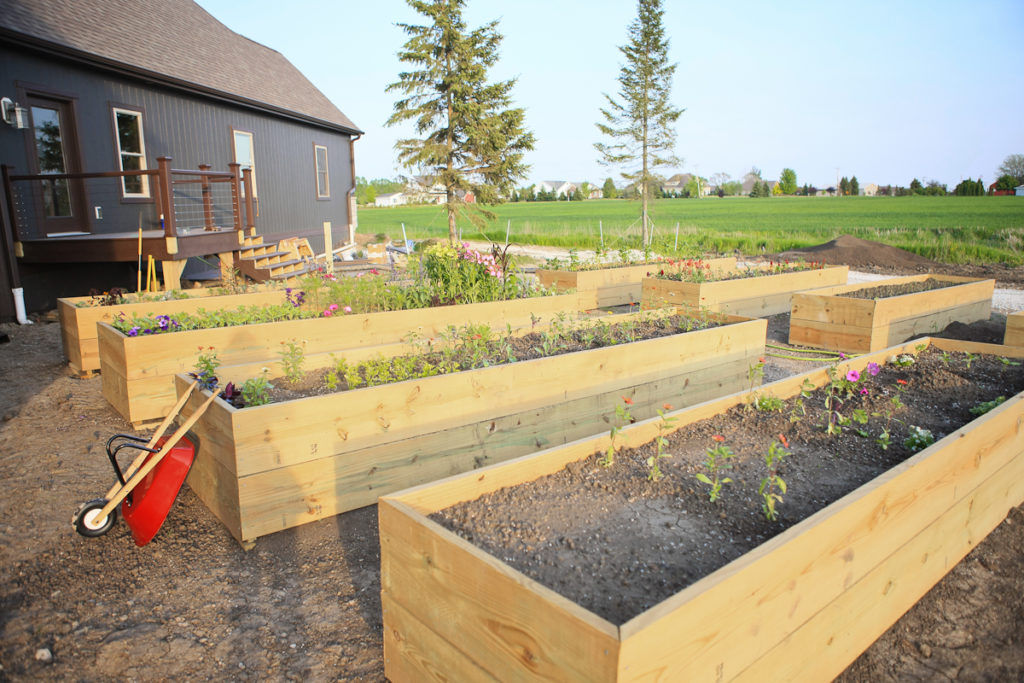 Lets start at the beginning. Before building the raised beds, I had to use the tractor and skid to scrape and work up the yard. After that, I was able to build my raised beds. I brought in help for this part of the project. Thank you, to carpenter, Forest Norton. Each raised bed is 3’Wx14’Lx2’H, and there are 8 beds. Once they were built, we had to fill them with soil. This is where your success truly begins. Each bed has 3 layers of soil in it. Each layer consists of 70% top soil, 25% potting soil and 5% worm castings. Once the first layer was in the raised bed, I then tilled it all together. I did that 3 times over, in each box. Everyone who sees my raised bed gardens are extremely impressed, and want to know what I’m doing to get them to look the way they do. That’s why I believe, the soil is the first step to success in raised bed gardening. Once I got my soil in and tilled, I then went ahead with planting and seeding my edibles and flowering annuals.
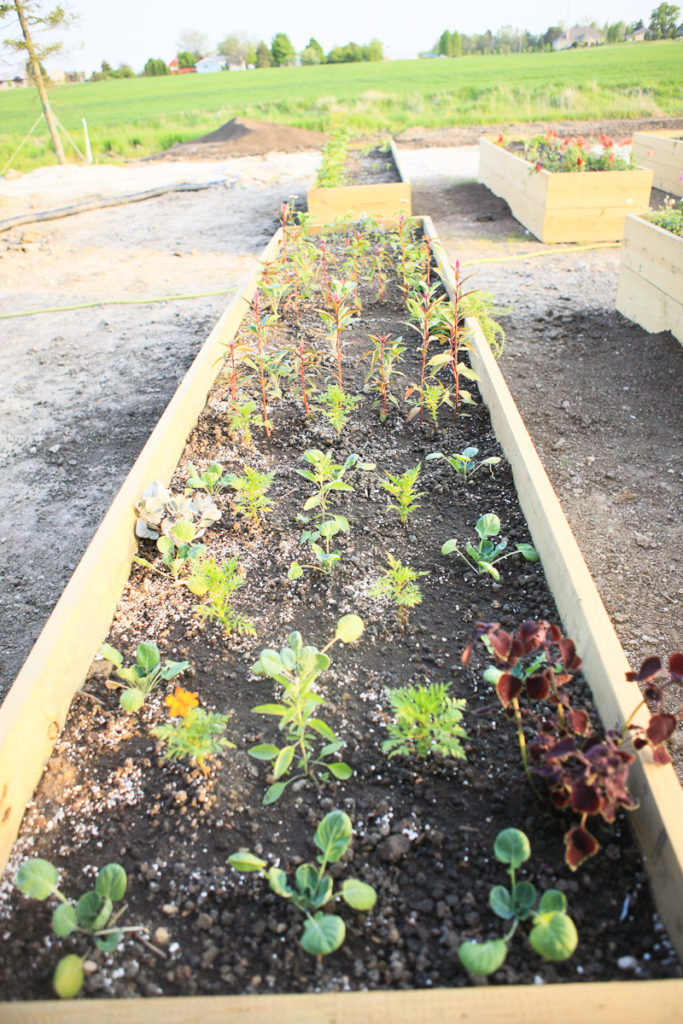
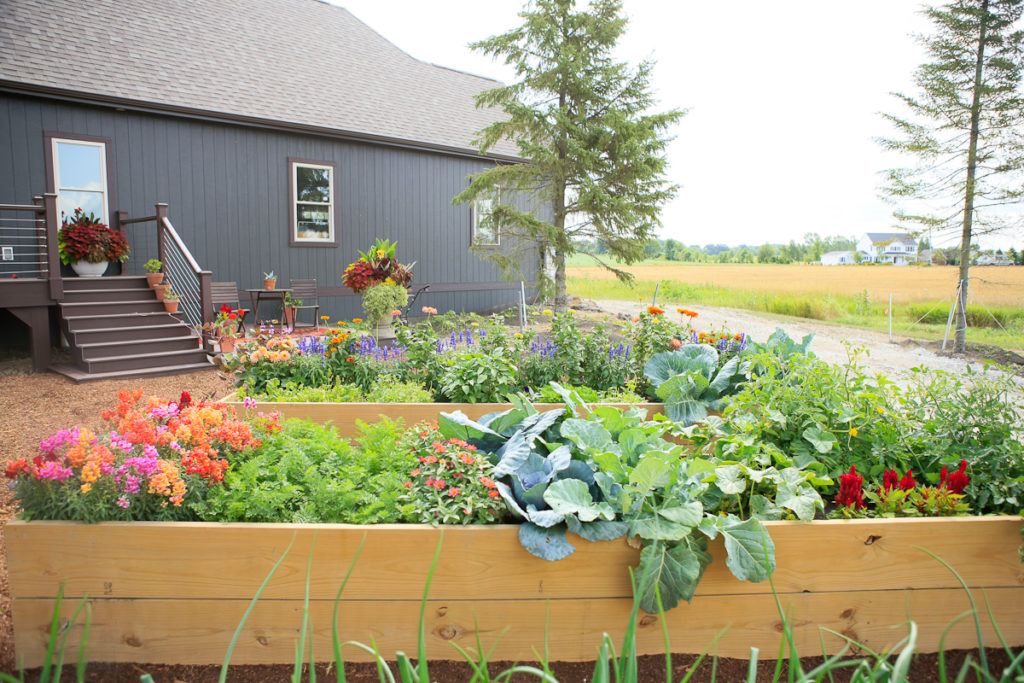
Welcome to my Garden Oasis! This is what it looked like in the month of May!
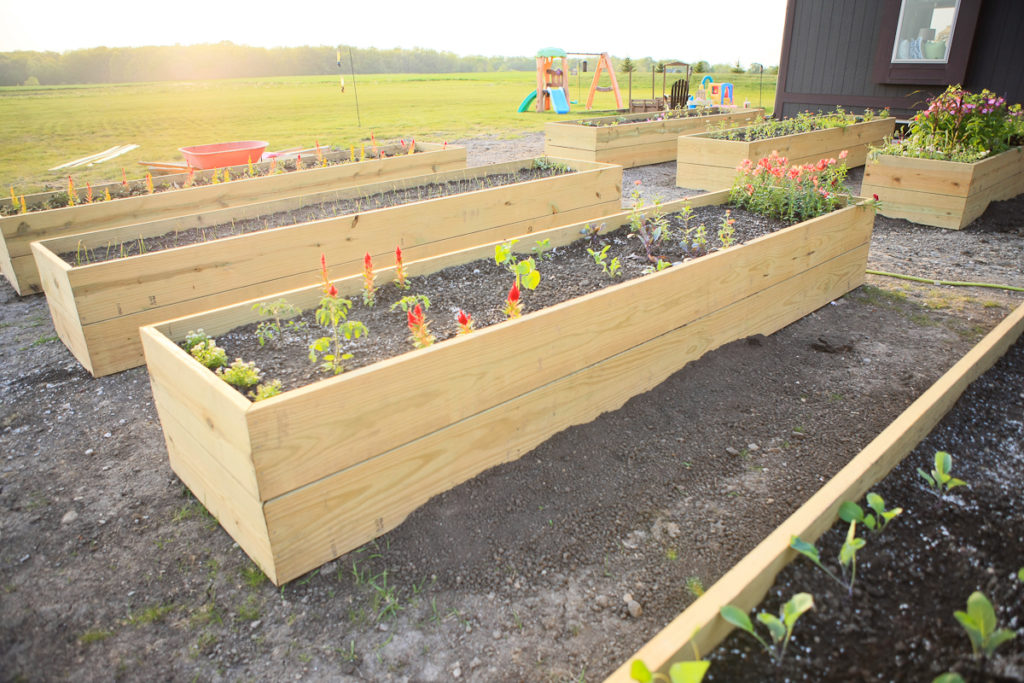
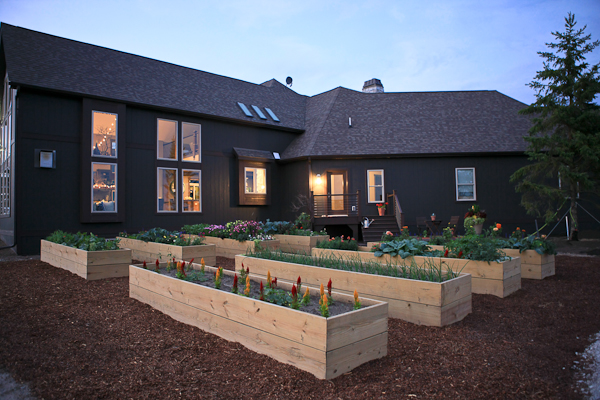
This is what it looked like 2 weeks ago!

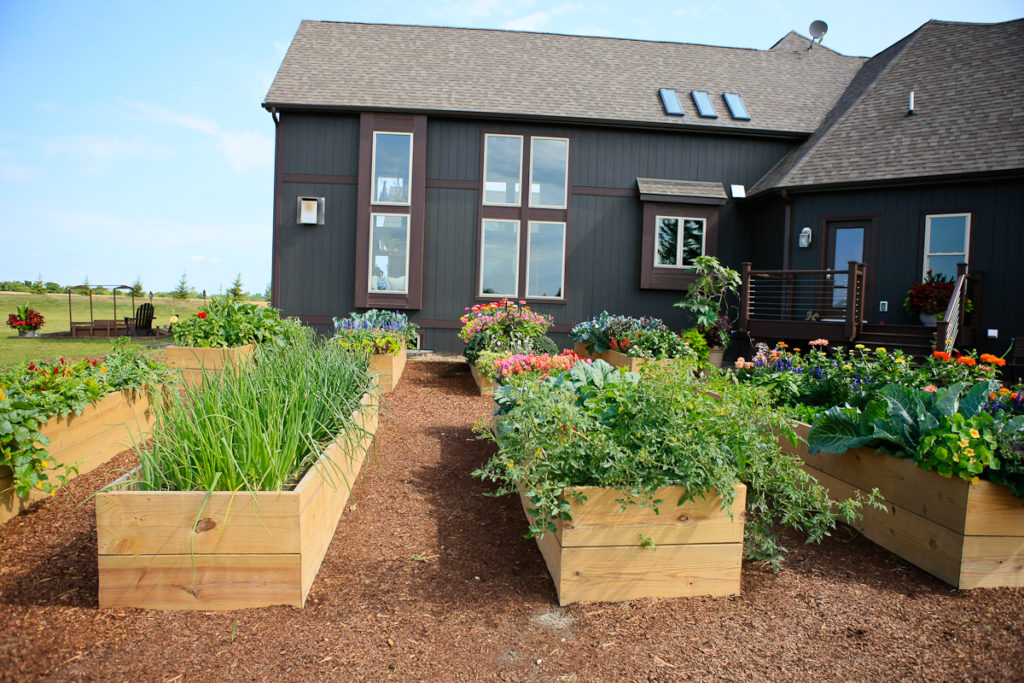
This is what it looks like today!
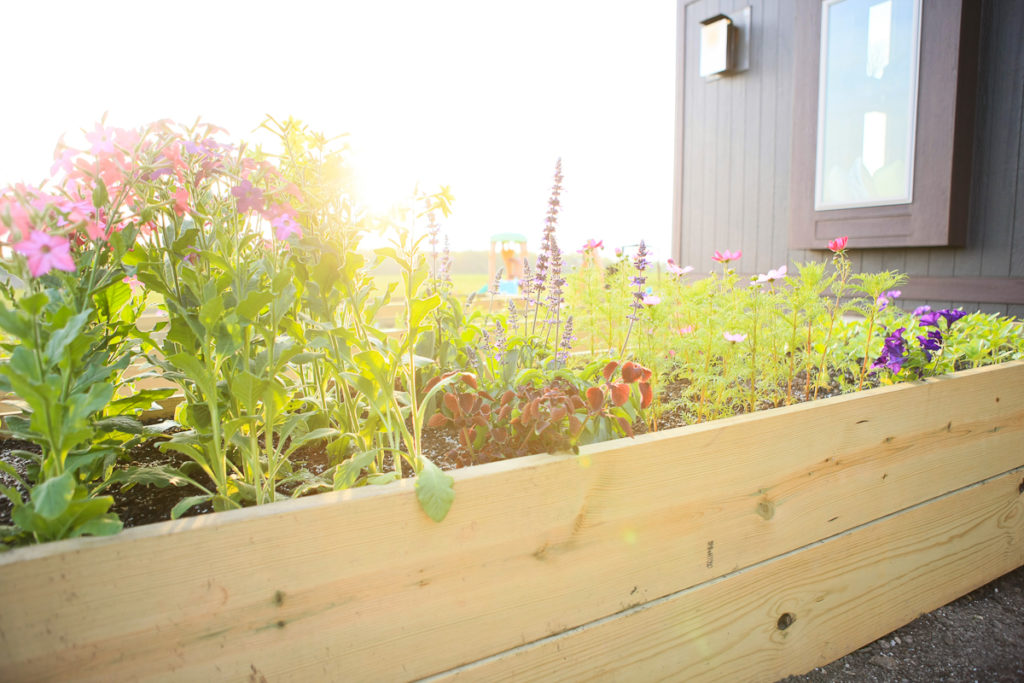
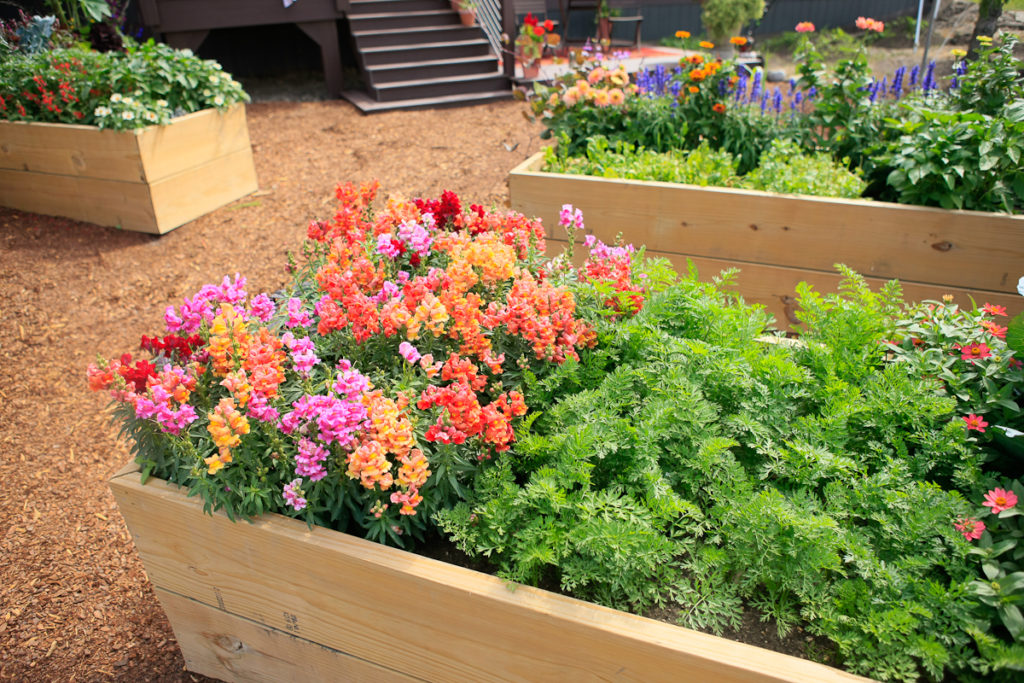
Lets start with my favorite raised bed, the cut flower garden.
Before.
AFTER.
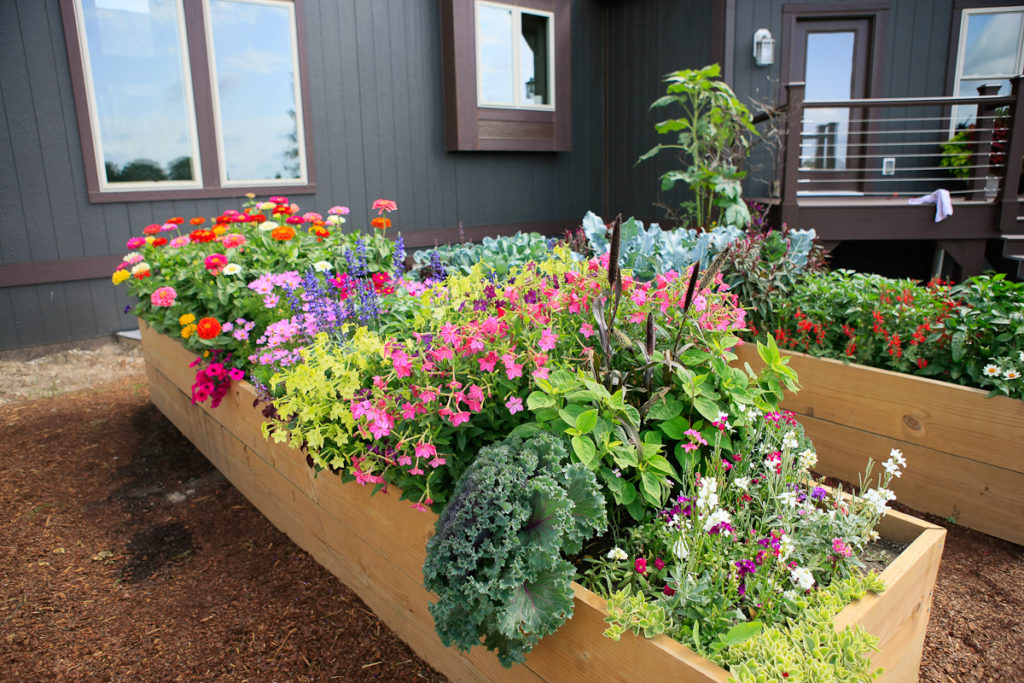

 I love this bed because it just brightens up the entire oasis, and gives off a sweet smell, thanks to the stock and fragrant Nicotiana. Out of this garden, I use Stock, Salvia, Cosmos, Millet and Zinias for cut flowers. Hibiscus, Flowering Kale, Nicotiana, Wave Petunias, Coleus and Mazo, are just added for different texture, colors and growth habits. They aren’t used in any of my cut flower arrangements. By adding items that aren’t cut flowers into the mix, makes it feel more like one big planter. Not only does this garden provide beautiful flowers and smells, it also provides a hang out for finches and humming birds.
 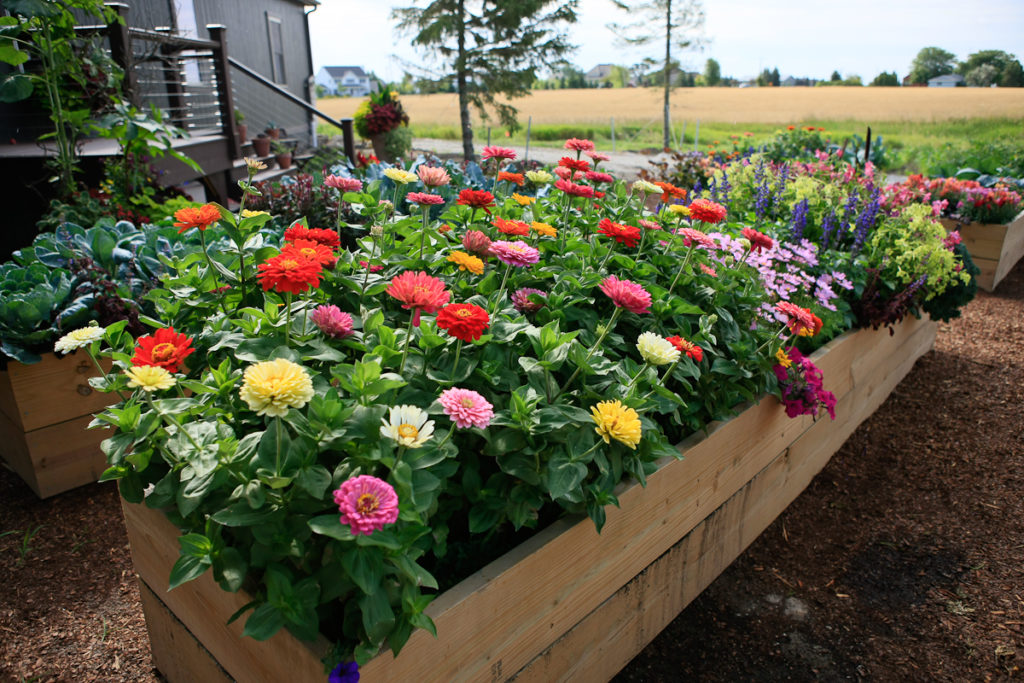 The finches like to land and eat seeds off of the Millet and Salvia. While the hummingbirds love nestling their little long beaks in the Nicotiana, Stock and Salvia. This year, I have actually heard the bees buzzing around the Garden Oasis.
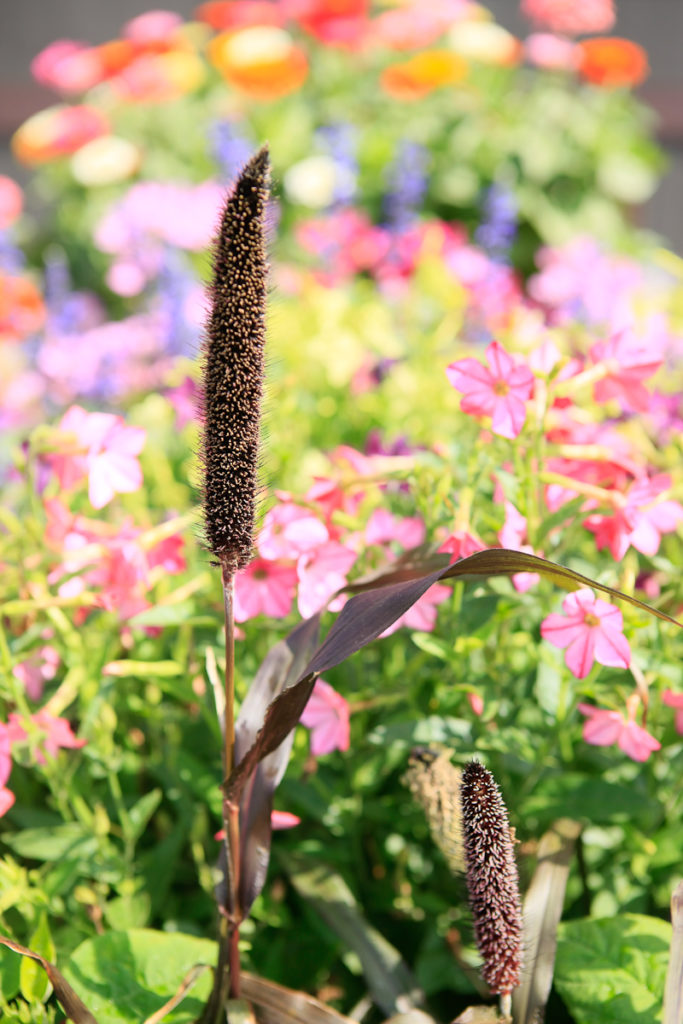
 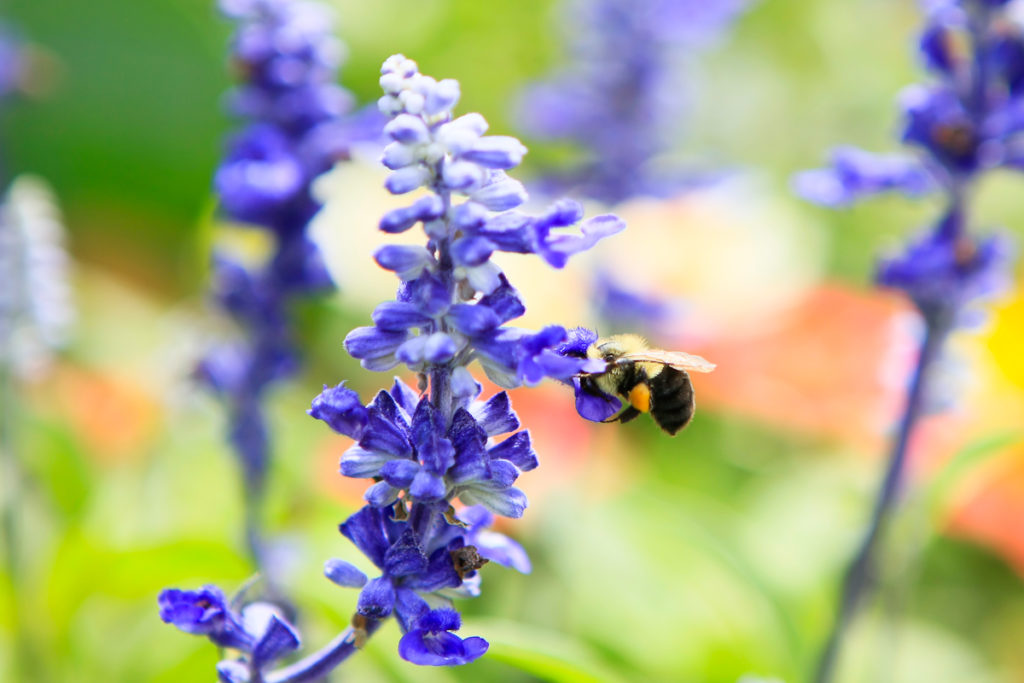 They tend to mind their own since they are busy at work. The State Fair Zinnias, pictured on the
 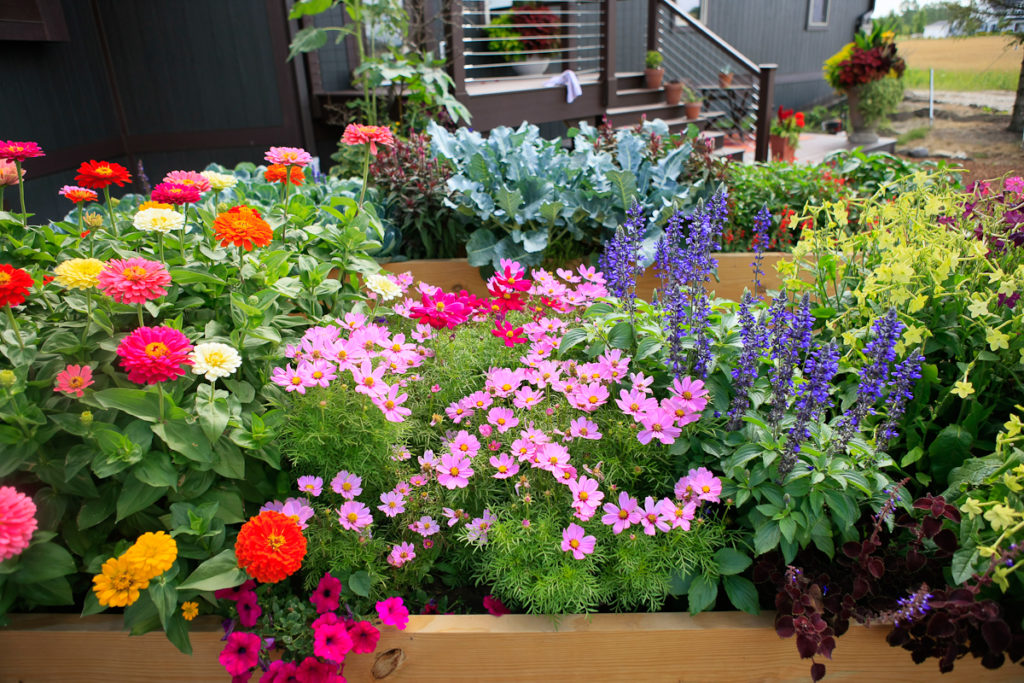 left, are my favorite for their color. These tend to find themselves on my table for display quite
often. By cutting the flowers off, it promotes new growth and bushiness for the plant. This way they don’t get too tall and lanky. With the wild winds I have out here in the country, tall and lanky plants tend to end up being broken plants. Cosmos, pictured on the left, are one of my favorites to cut for bouquets. It adds such an airiness to an arrangement. Even though these are beautiful, I accidentally planted the shorter series of cosmos. I meant to plant the taller series. I have to cut quite a bit off of the plant, in order to get a good length cut flower off of it. Which is fine, but next year, I will pay closer attention.
Here is my Melon raised bed garden!
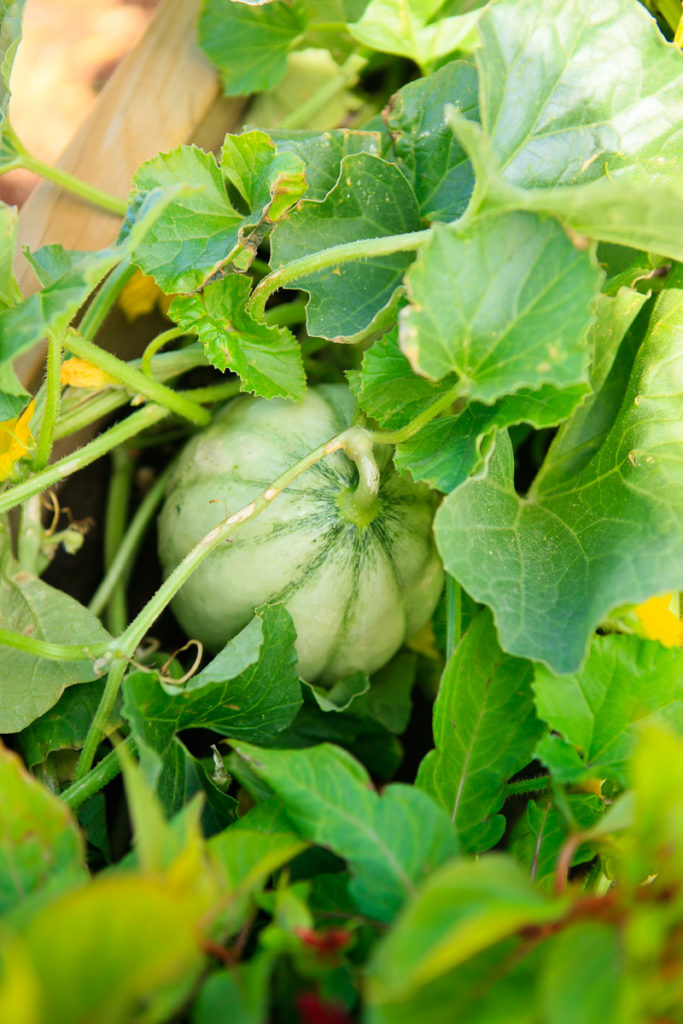
In this raised bed, I have two varieties of Melons. I have Cantaloupe (Superstar), and Watermelon (Crimson Sweet, Large Variety). The yellow and red flowers you see sticking out of the melon vines, is the flowering annual, Celosia. In order for the Celosia to survive among these wild melon vines, you have to control and tame the melon vines. What I mean by this is, I literally take the vines and place them where I want them to trail. If they are growing on top of a Celosia, I steer it around the Celosia. Once it is steered around, there may be some large melon leaves canopying over the Celosia. I just snip those leaves off, so it exposes the Celosia to the sunlight. That’s what I do for all of my flowering annuals that are intermixed with my edibles. It may sound like a lot of work, but it is really quite a small task for the beauty that comes from the flowering annuals amongst the edibles.
This next box contains Brussel Sprouts, Broccoli, Hot Peppers and Sweet Peppers. This is what the box looked like when it was first planted.
This is what it looks like today!
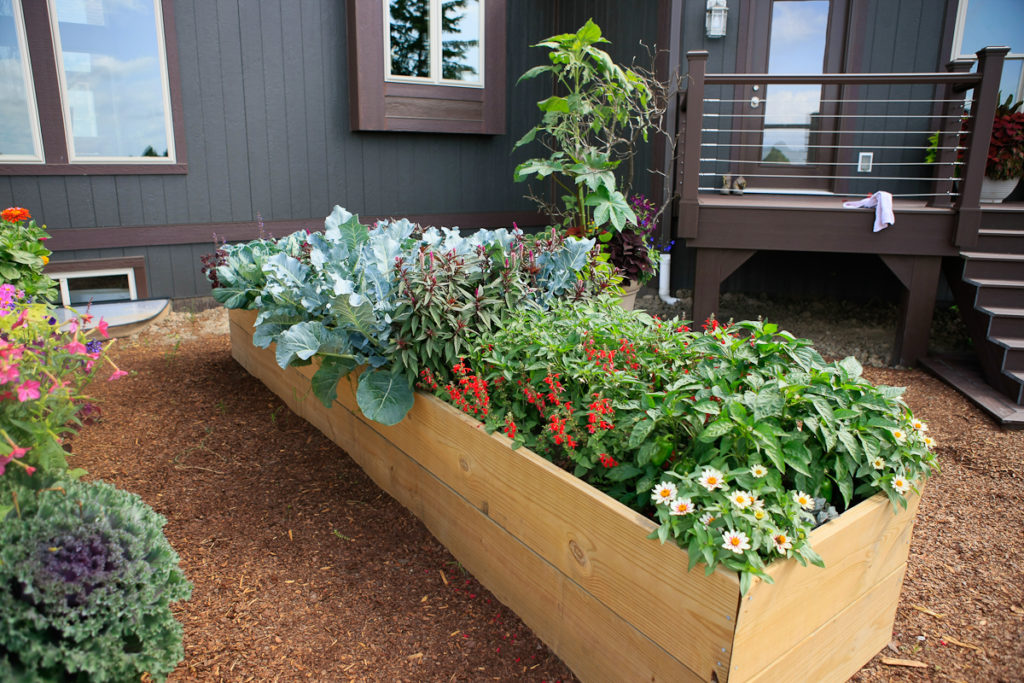
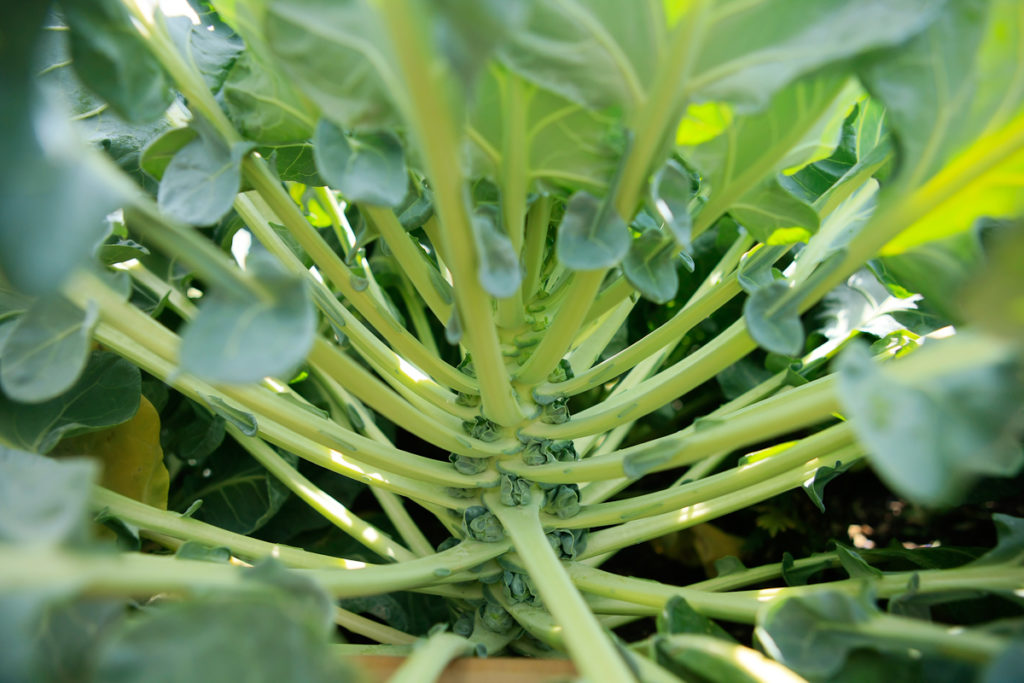
My Brussel Sprouts are right along with where they should be. They are looking great, and haven’t required much attention, other than watering lightly in the morning, weeding and eliminating dead leaves from underneath. By keeping the surface of the soil clean from any bad leaves and weeds, reduces your chances of having a bad bug infestation.
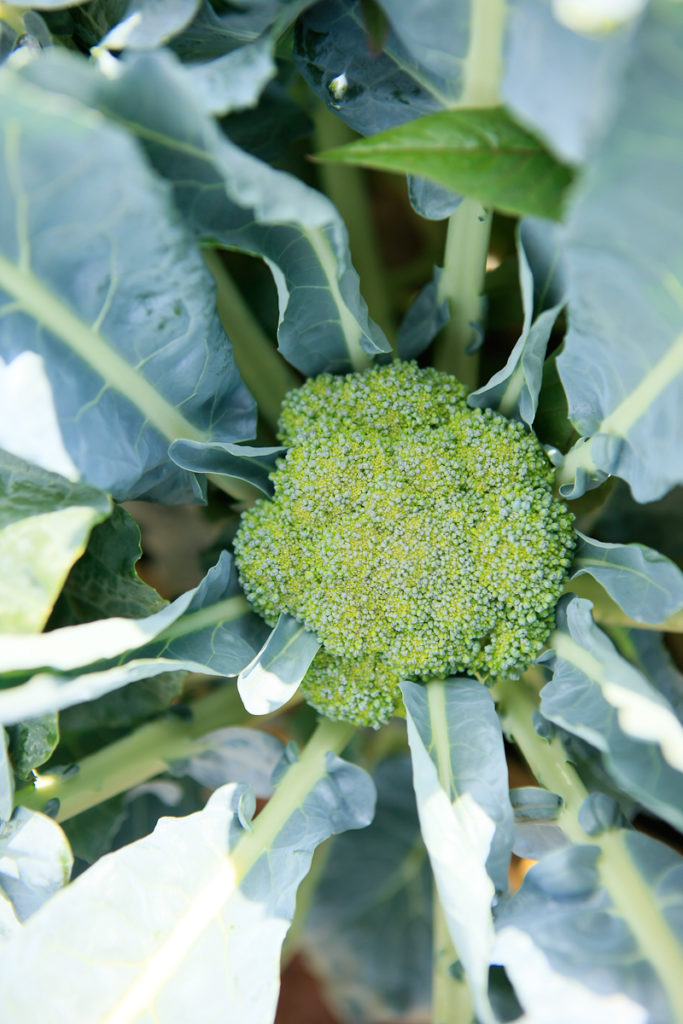
I planted Broccoli plants May 28th. This is what my broccoli looks like today. In another 1-2 weeks it should be ready to cut. There are more growths on the sides and along the stem that will follow shortly behind this big head once it is cut. I am a gardener that tries to keep my edibles as organic as possible. With broccoli, it is just one of those crops that is a little hard to do that with. It is very prone to worms, which then eat at your Broccoli. Lets face it, once we see worms on food, it doesn’t always look as appealing, even if they are all taken off. I did spray my Broccoli to avoid this worm problem, but I sprayed before the head even started developing. I took this same action with my Brussle Sprouts.
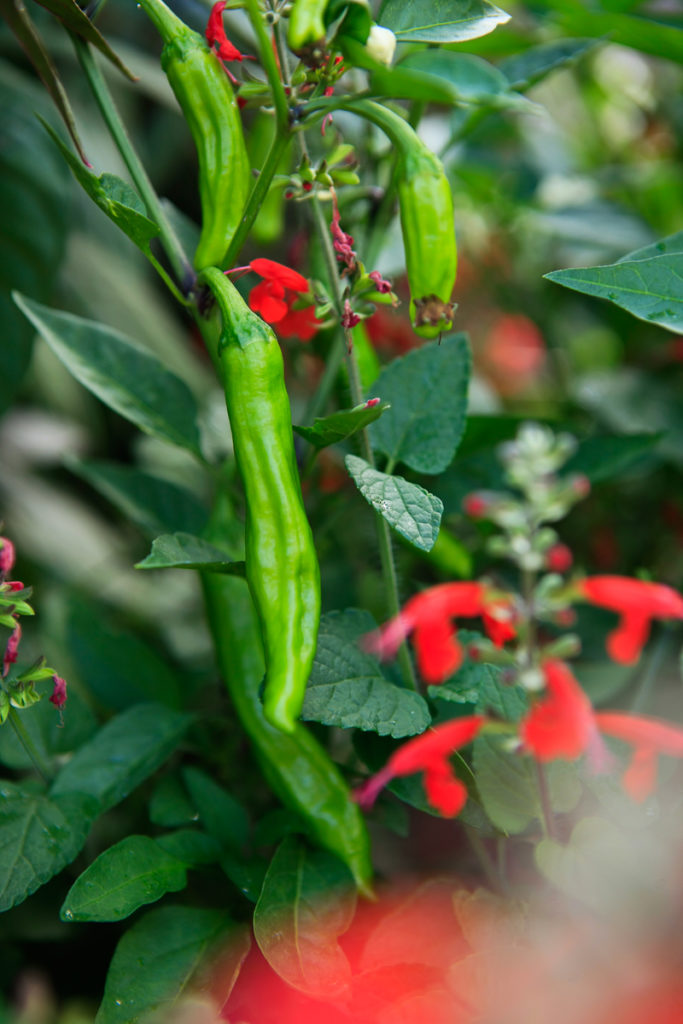
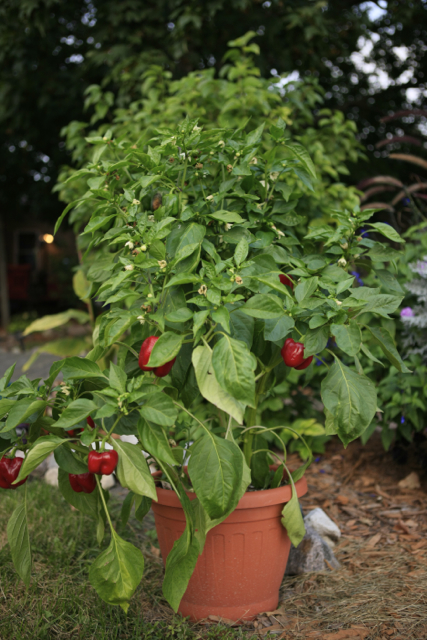
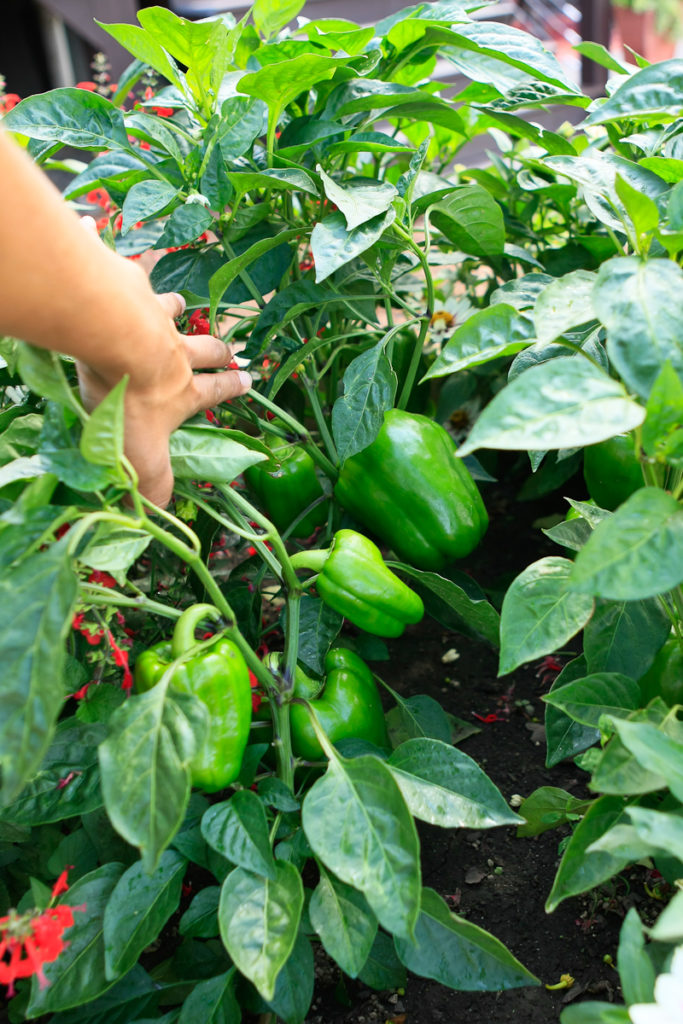 Here are my Hot Peppers and Sweet Peppers. I planted these plants on May 28th. The Hot Peppers are just for my husband, because I don’t like things too spicy. I will can quite a few for him so he can enjoy these hot little things for months to come. I surrounded the Hot Peppers with Red Lace Salvia, so the color red would be a warning to my husband and little ones. It worked out quite well so far! The Sweet Peppers are looking big, but they aren’t ready to be harvested yet. They will be turning orange, red and yellow very soon. I only grow red orange and yellow Peppers because they are so sweet, you don’t even need to dip them in anything. I never grow Green Peppers anymore. Green Peppers, in our household, are like the last kid being picked at recess. Here is an image below of how the Peppers are separated by my Red Lace Salvia.
This is my herb garden on May 21st. It looks quite bare, because I seed my herbs. I feel you get such a better crop from your herbs when they are seeded, compared to planting a plant. In this garden, I have Spinach, Cilantro, Lunchbox Peppers, Bay Leaf, Parsley, Basil, Cabbage, Cauliflower, Nasturtium and other flowering annuals. Lets take a look at some of these varieties today.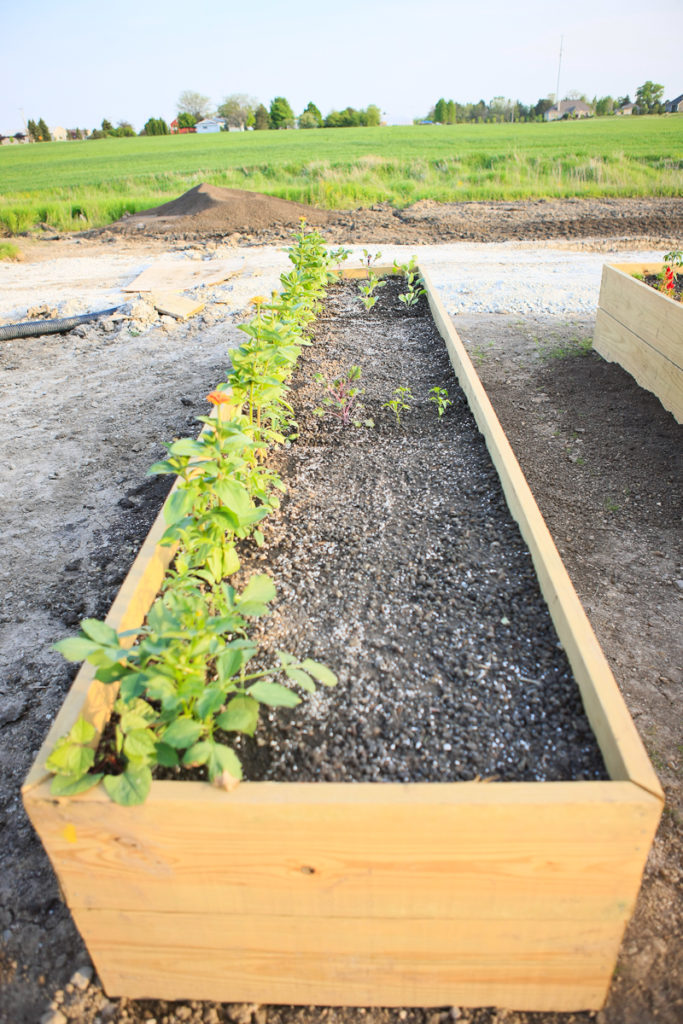
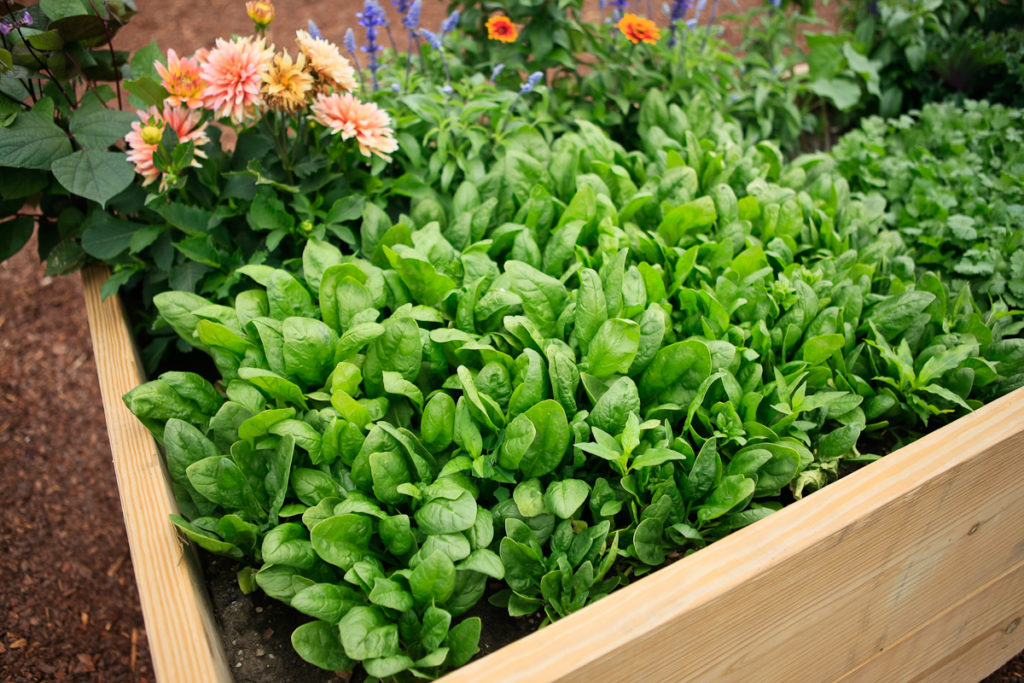 Here are is my spinach. This photo was taken a couple weeks ago, because it was ready to harvest. I eat spinach fresh, and I also freeze it. During the winter months, I use it for my hearty recipes, such as my famous Spinach Dip at holiday gatherings. You should seed spinach in succession plantings, because once it is cut, it is done. (Succession plantings means, to plant or seed something every 1-2 weeks.) I just did one big planting, and now I will work up this soil, and reseed it. By the end of summer I will have another huge round of spinach.
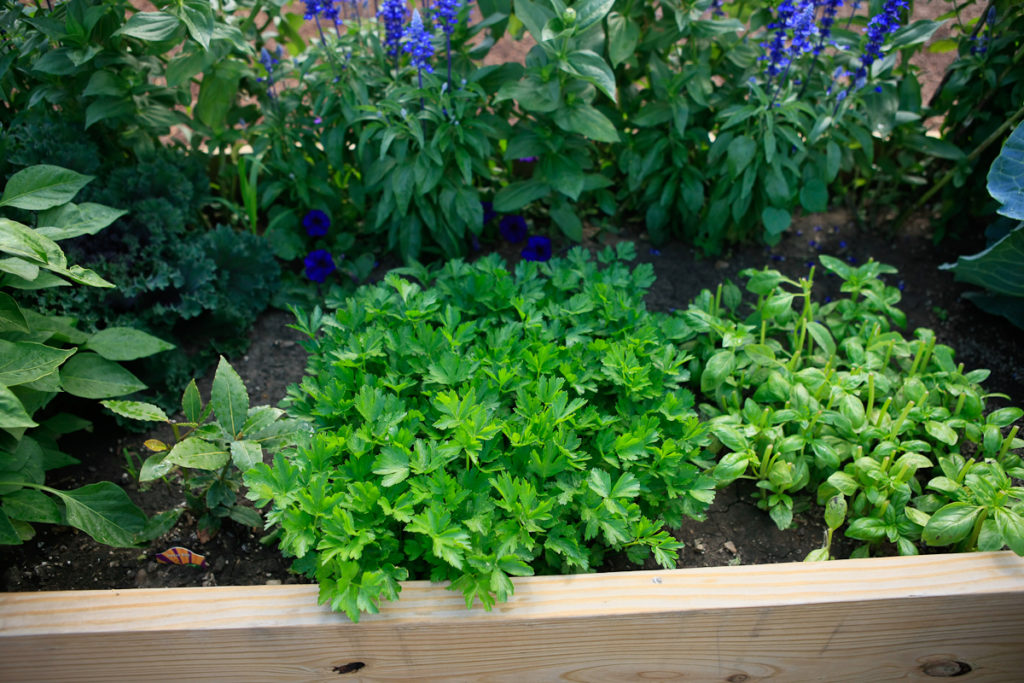 In the photo on the right, is my Bay Leaf, Parsley and Basil. As you can see, the Basil is cut. You always want to cut your herbs before they seed out. This promotes continual growth and harvest, and your herbs will not get hard and stalky. I dry all of my own herbs for my hearty home cooking. So when I harvest them, I cut them all, except for one little section. This way, I still have fresh herbs to use in my current recipes. Nothing is better than fresh herbs, but if you have to resort to dry herbs, nothing is better than homemade dried herbs.
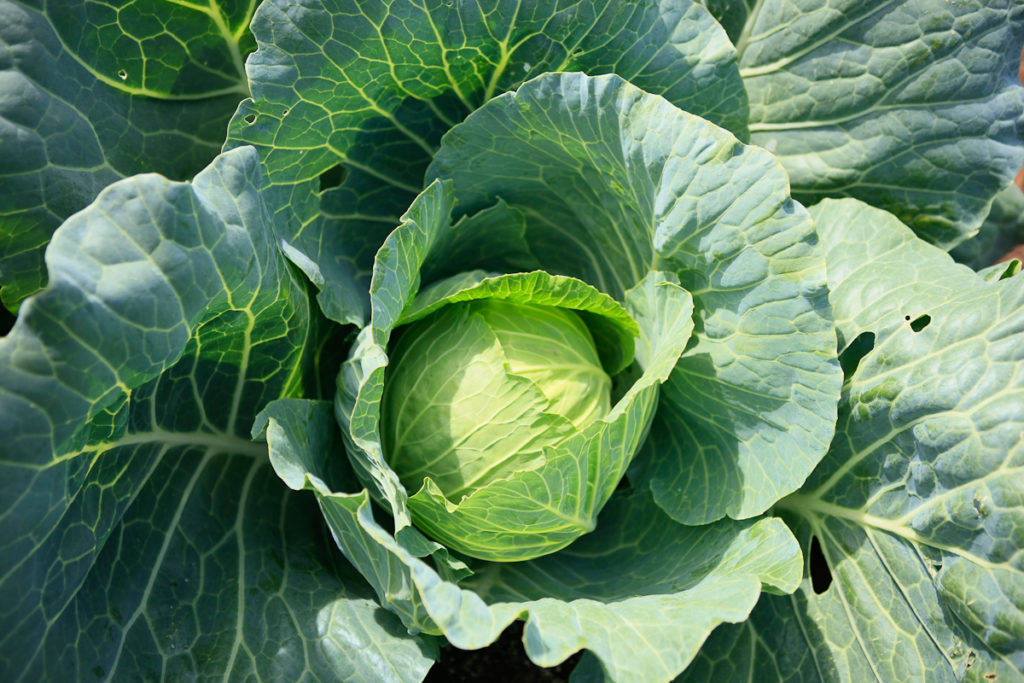
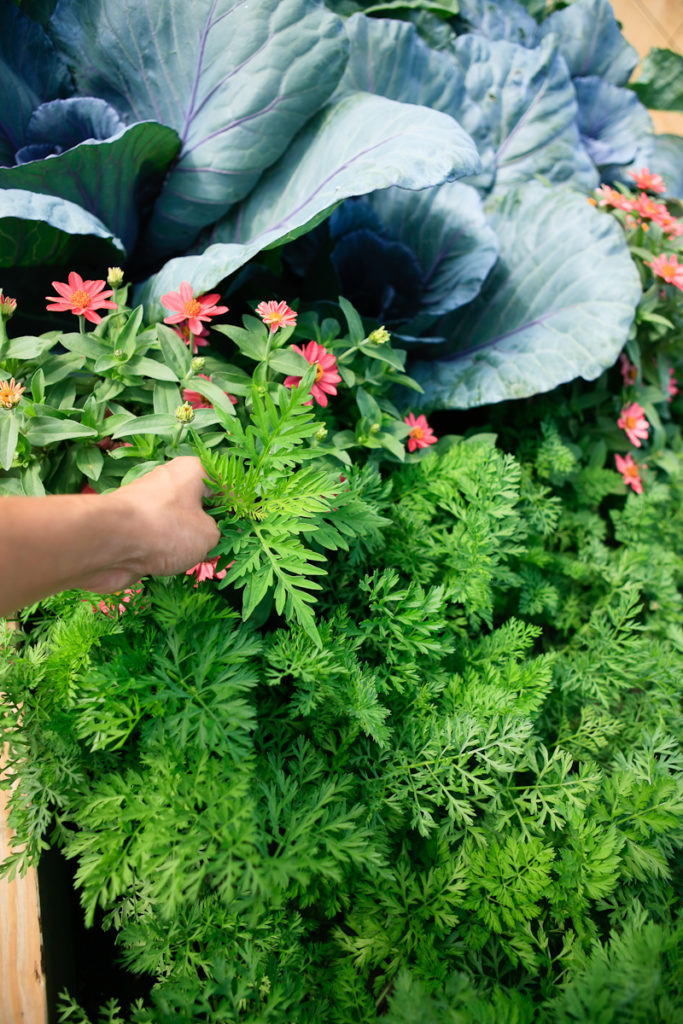
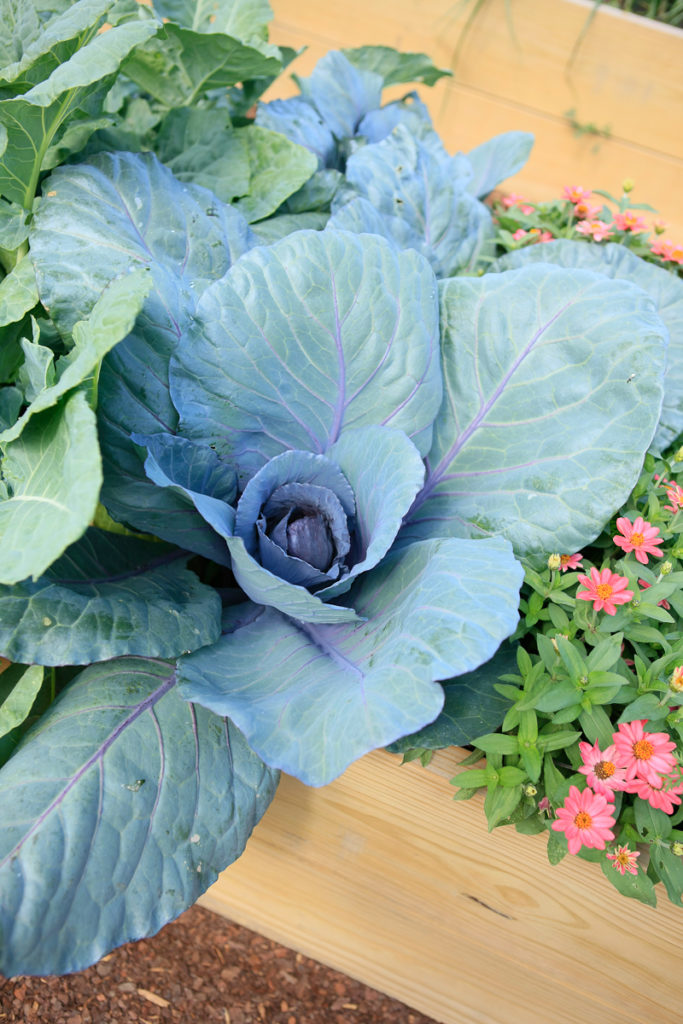
 Here is my giant cabbage. This picture was taken over a week ago, and it is even bigger today. I just planted one of these for a trial. I wanted to see how well it grew, and what the growth habit would be like. So far, it is looking amazing and ginormous! I can see many meals coming from this one head of cabbage. It is also an earlier variety, so I will be harvesting it very soon. I did plant other varieties of cabbage, that I will show you through out the article. I will be making my own sour kraut this year, since I make a mean Reuben for my honey! In the next image
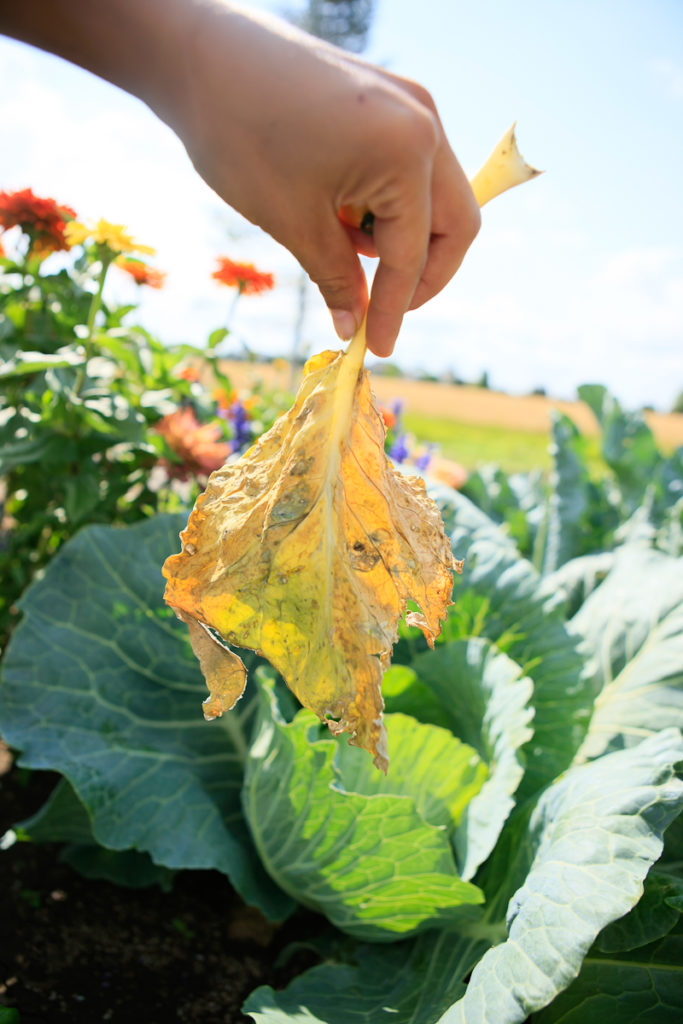
shown, you see me holding a huge dead leaf. I go through all my edible gardens and remove any dead leaves and weeds I find. I scrape the surface of the soil with my hand and scoop up anything that doesn’t belong. By doing this, it reduces your chances of have a bug infestation. I do this with all my garden beds, even my flowering containers! Be sure to put any old leaves and weeds into a pail and toss away. Don’t leave them near or around the garden bed. Not only does it look ugly, but that is like leaving an invitation to any harmful pests looking for a place to stay. By cleaning, not only will it reduce your chances of a bug infestation, but it also reduces your need for having to use harmful chemicals to control the problem. Go as organic as you can!
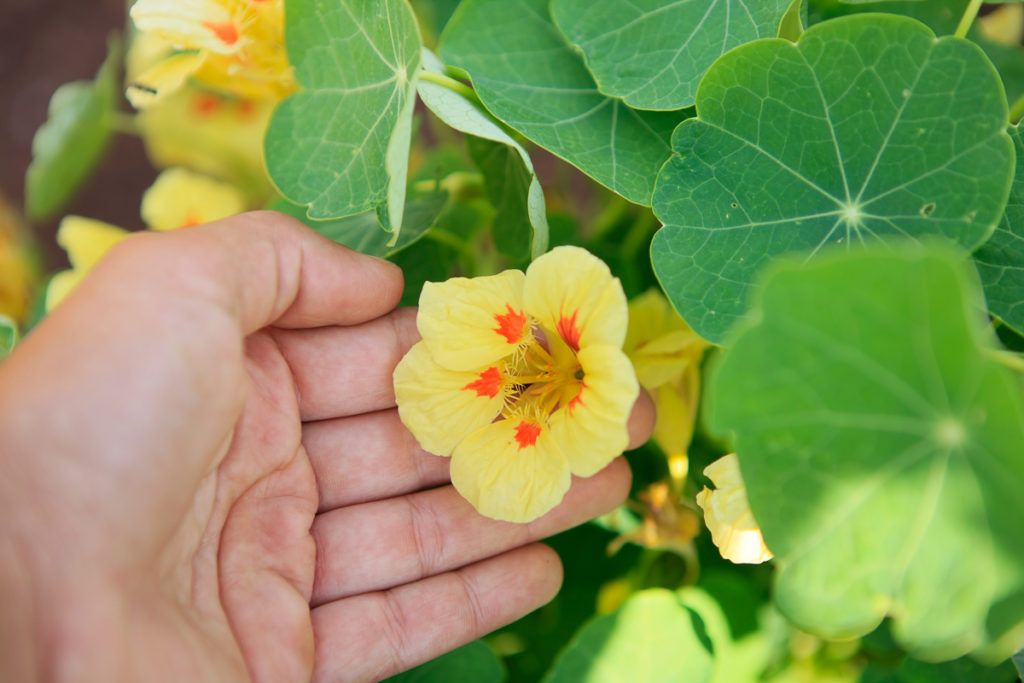
Here are my Nasturtium. They are an edible flower, and they come in many colors. I love using these to dress up my salads. Not only are they good to eat, but they are also beautiful in this raised bed garden!
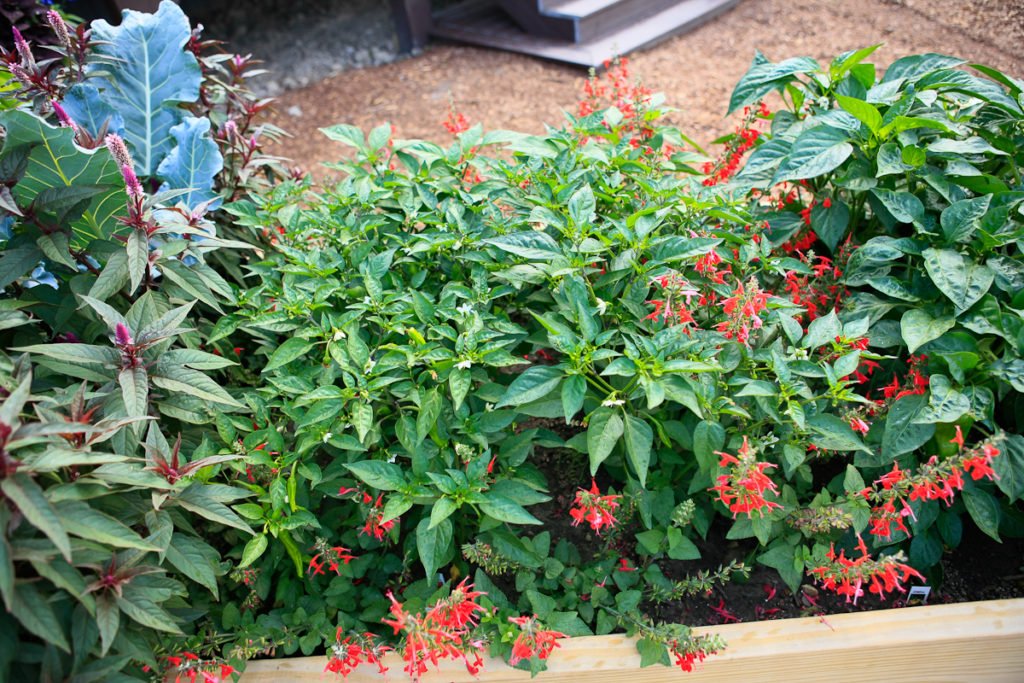
 Through out my herb bed I have Flowering annuals. As you can see, I did a tall row of flowering annuals along the one side of this box, from one end to the other. I did this because I feel I always have the best luck with herbs when they aren’t in full hot sun all day long. By placing these tall flowering annuals on one side of the box, it blocks the hot sun until noon. My herbs then get sun from noon on. By doing this, I never get any brown leaves on my herbs and they never get a stressed out look. For my flowering annuals in this box, I used specialty Zinnias, Victoria Blue Salvia, Dahlias, Nasturtium, Wave Petunias, Sweet Pea Vine and Flowering Kale.
This raised bed was planted on May 21st. It holds, Carrots, Red Cabbage, Kohlrabi, Cucumbers and Tomatoes It also includes flowering annuals such as, Snapdragons, Celosia, Zinnias and Sweet Alyssum.
This is the raised bed garden today!
Here is an image of my beautiful Snap Dragons and Carrots. My Snaps just keep on blooming for continual cut flowers. The more you cut them, the more they bush out and bloom. The smell of these are unbelievable! It just lingers in the air through out the entire garden oasis. The carrots are now starting to get huge. I seeded these guys on May 21st, and this is what they look like now. I pulled one out, just to see the progress below the surface of the soil. It was the size of a miniature carrot, so there is still a little ways to go. We
will eat most of these carrots fresh in our meals and smoothies. The rest will get chopped and frozen for my Famous Homemade Soups and Rollie Pollie Beef Spinollies! (Recipes coming soon.) Don’t forget to keep your carrots weeded. Weeds can stress your carrots out since they are a root vegetable. Weed roots can over take your carrots and just about rot them out. Don’t be fooled by rag weeds through out your carrots, since they look very similar. If you are unsure, just follow the stem to the bottom. If it is attached to a lot of growth, then that is a carrot. If it is not attached to a lot of growth, and it is just one single stem, then that is a rag weed. Pull it!
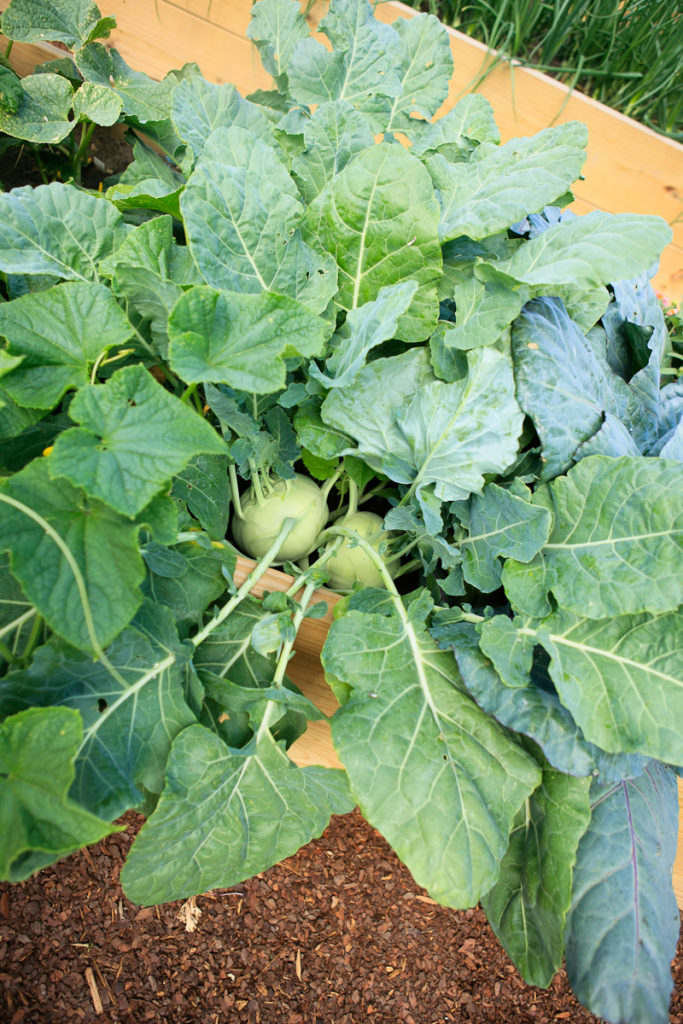 I planted plants for my Red Cabbage. I haven’t done much to it, other than lightly water every other day, and remove any bad leaves from the bottom of the plant. I do cut a leaf here and there for my flower arrangements, and to control it so it doesn’t drown out the Zinnias that are right next to it. I planted plants for my Kohlrabi, and these are the Kosaki variety. They get huge, so these guys are almost all done. They get the same care as the Red Cabbage, and their leaves also get used in arrangements. Kohlrabi are best for fresh eating.
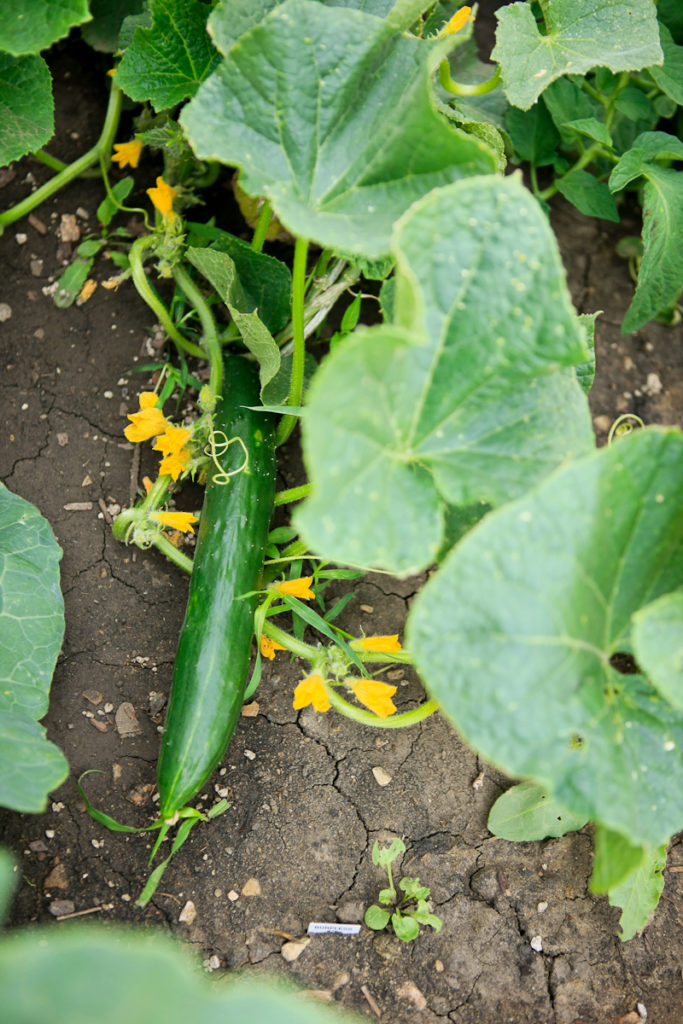
Here is one cucumber plant that I planted. It is already producing beautiful food for my family. Nothing tastes better than a freshly picked cucumber right out your door. I seeded 3 other mounds of cucumbers in my ground bed, so those are 3 weeks behind this plant here. I did that so I would continuously have cucumbers throughout the summer season. I make all kinds of fresh recipes with this summertime favorite! I don’t do much to care for my cucumber plants. I rarely water, since they tend to like it dry.
Here are my Tomatoes.
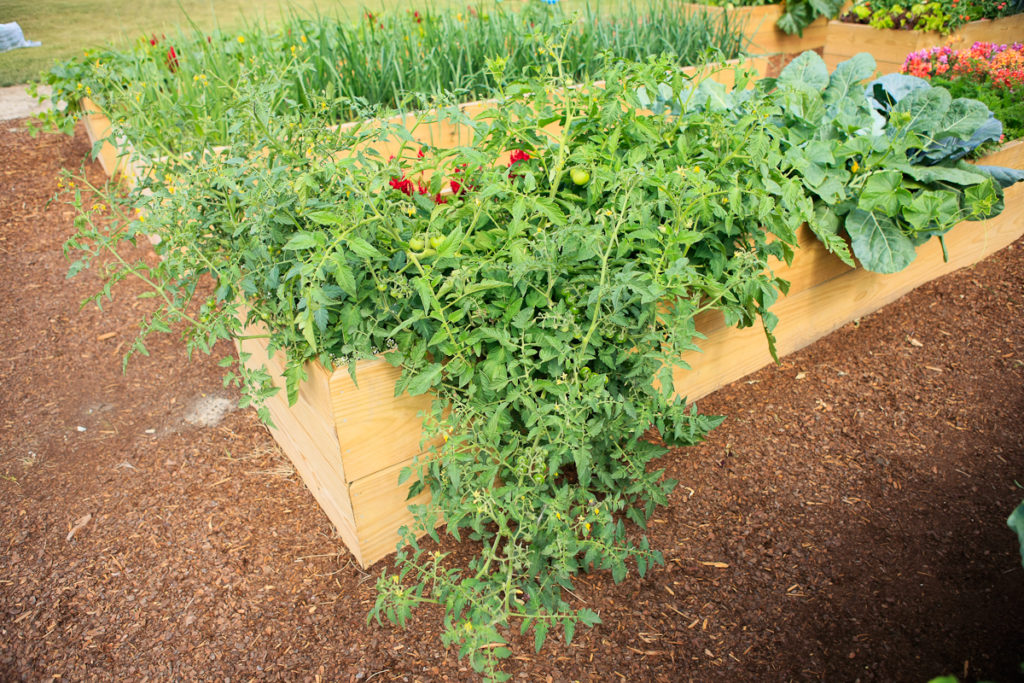
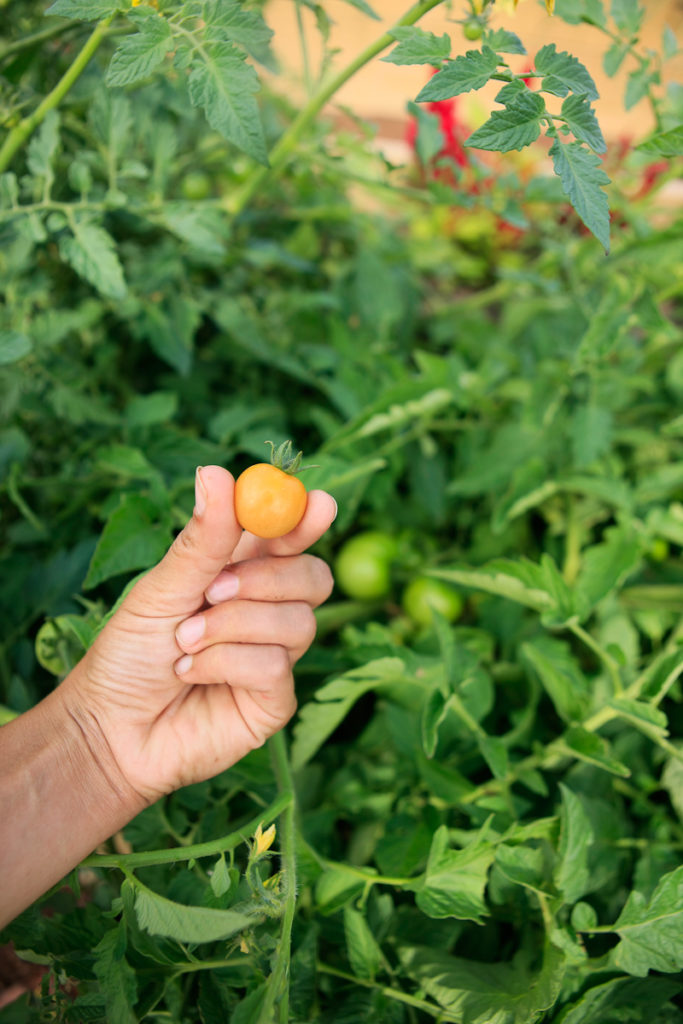
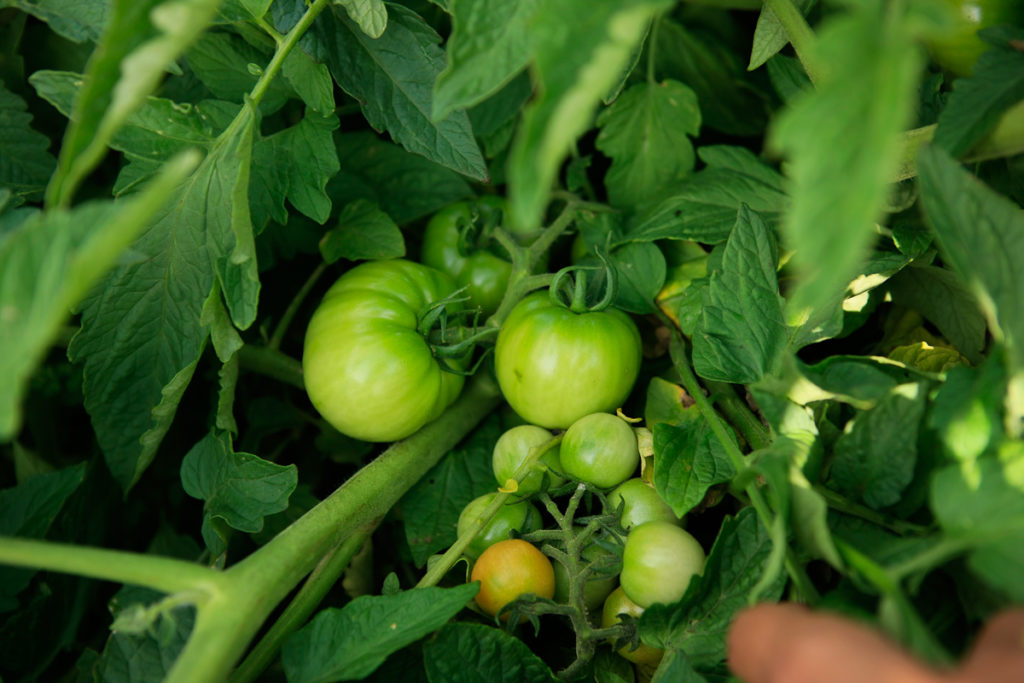 I planted these plants on May 21st. I only did 3 plants, and each one is a different kind. I did 1 large variety, Pik Red Tomato. My other 2 varieties, are small sweet tomatoes, Cherry Tomato and Sugar Plum Tomato. I usually plant a ton of tomatoes for canning special recipes, but I had a lot left over from last year. I don’t like waste, so I plan on using everything up, and planting a ton of tomatoes next year.
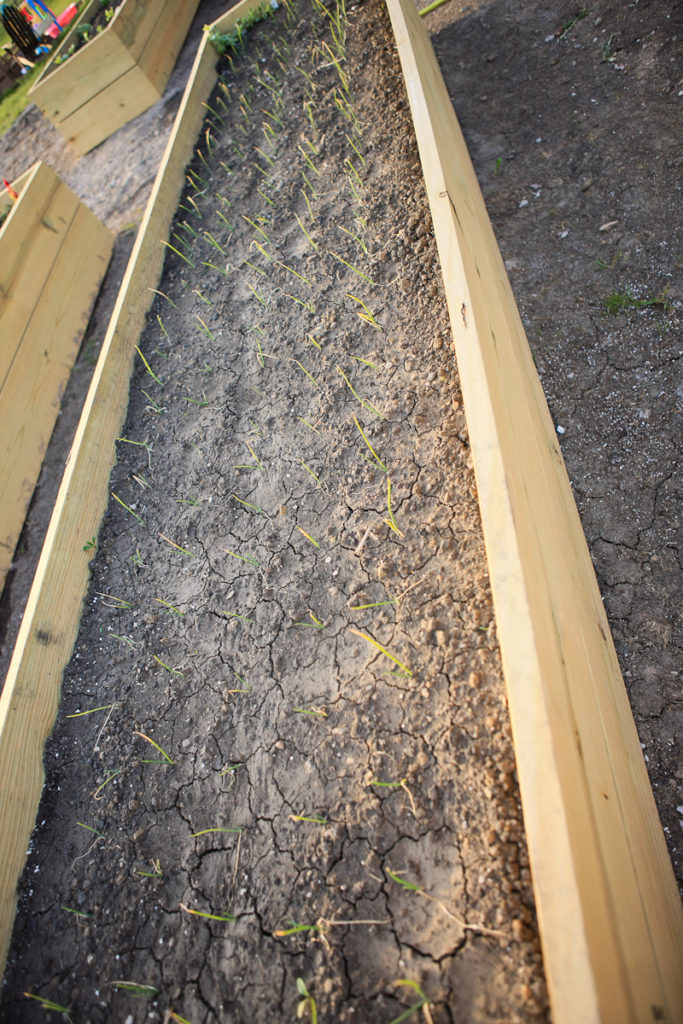
Here is my Onion bed on May 21st.
Here it is today!
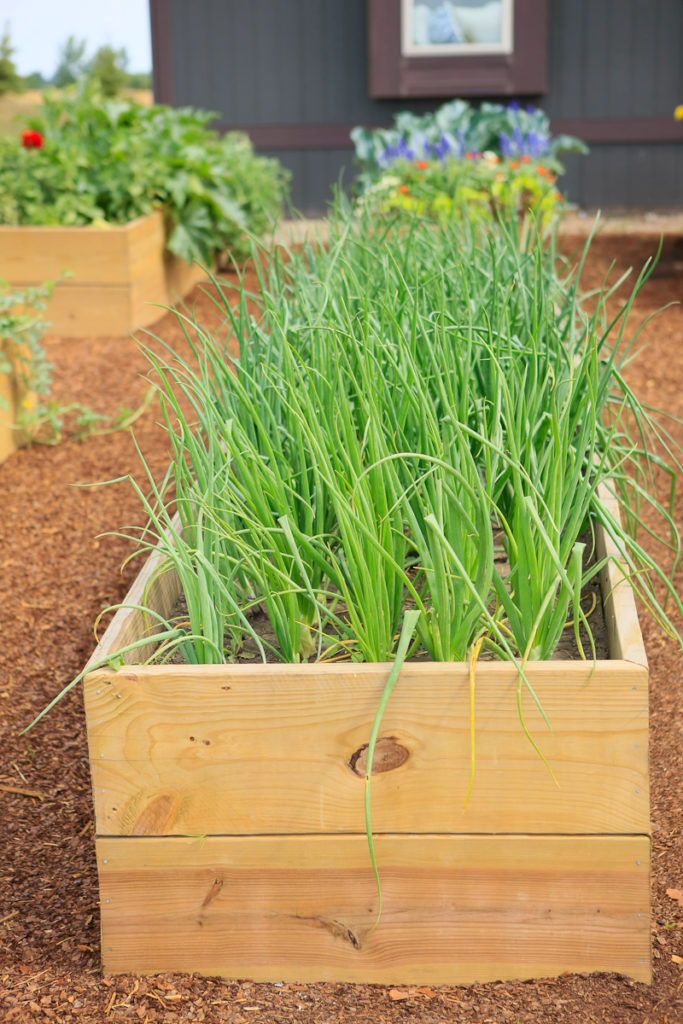
 I have been asked by many people, what are you doing to your onions? It seems that my onions are pretty impressive. All I have been doing is lightly going over them with water almost every day and that’s it. I think most of the success of my onions is due to the mixture of my soil. Adding Worm Castings to my soil is the one thing I did differently than anyone I have talked to. I have 4 different varieties of Onions in this bed. I have Yellow Spanish, White Spanish, Walla Walla, and Red Onions. What do I do with all of these onions? I harvest them all, put them in crates and store them in my garage with a blanket over them. They stay nice all winter long!
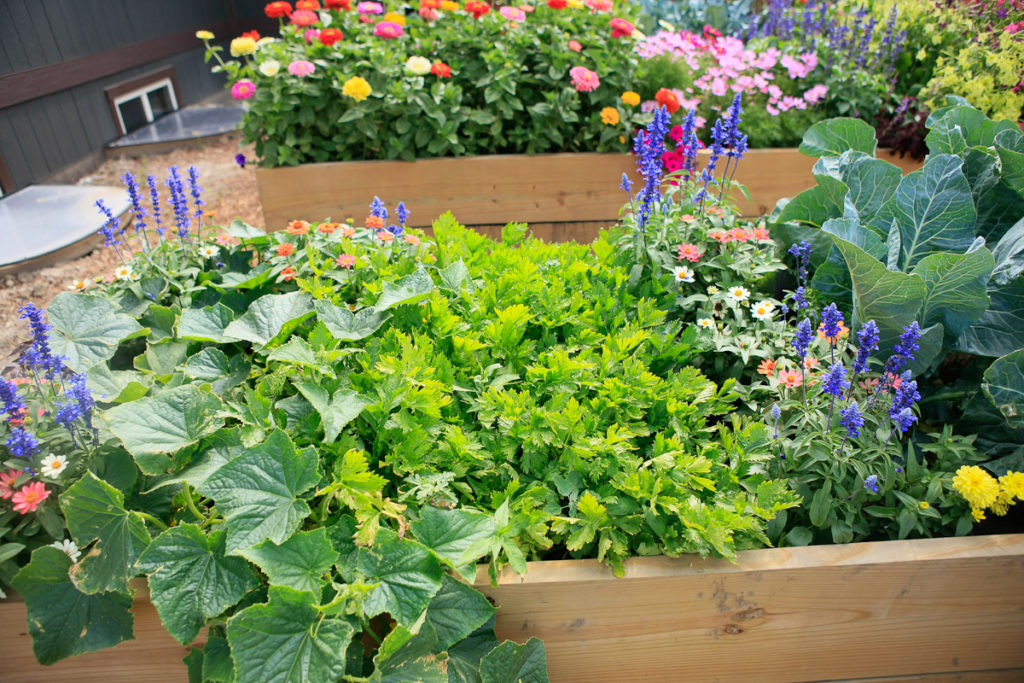
This next garden includes Peas, Zucchini, Head Lettuce, Herbs and Flowering Annuals.
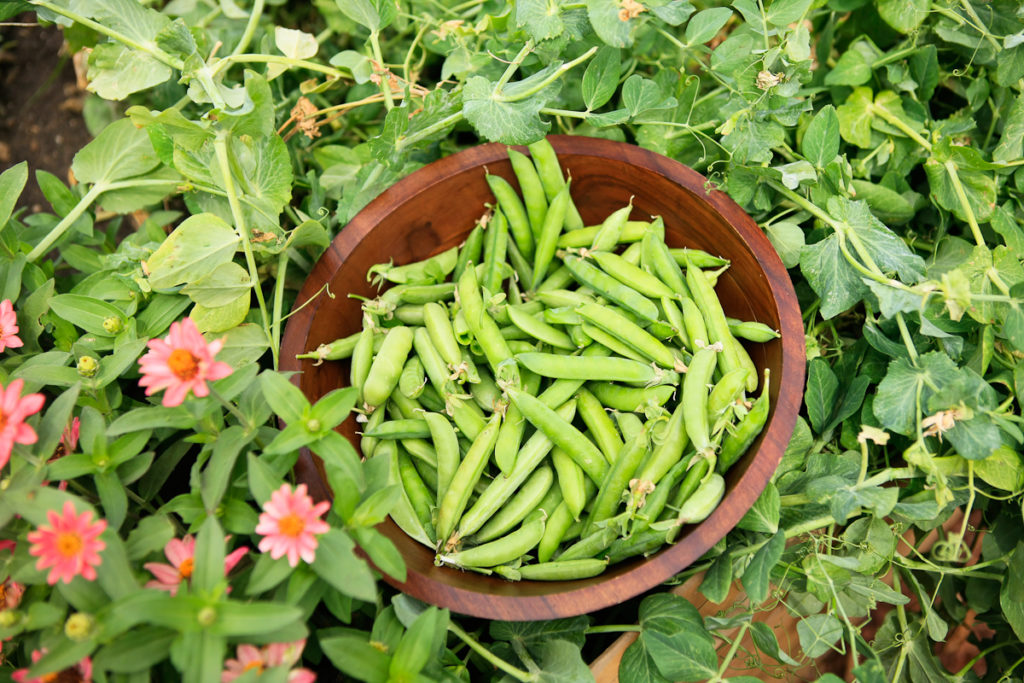
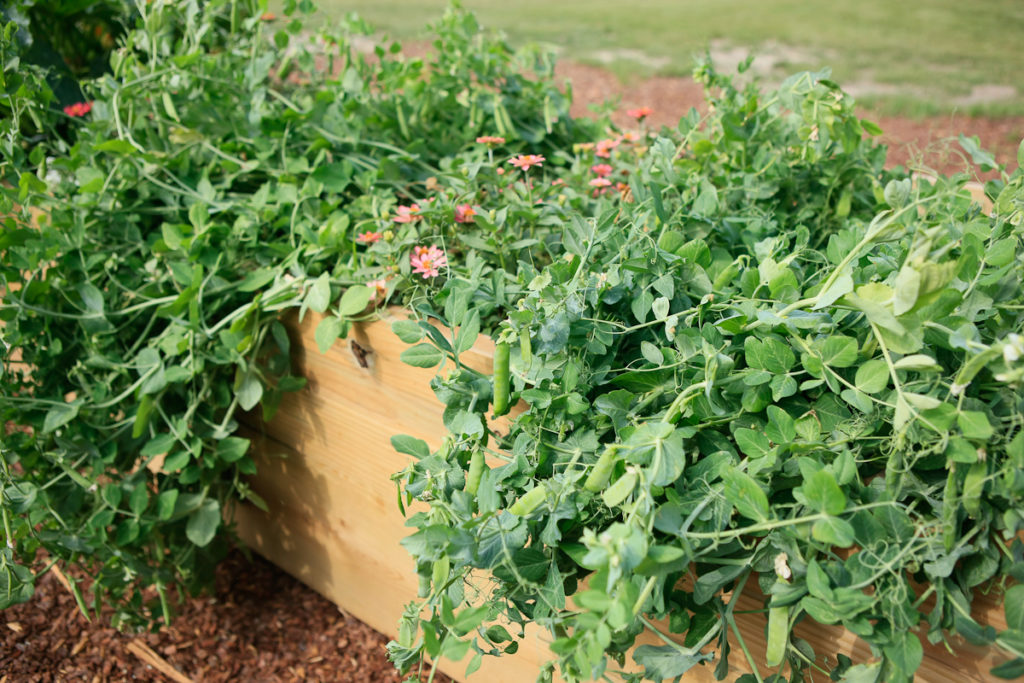 Lets start with my seeded Peas. They are the one thing that I look forward to the most, every year! Nothing is better than the taste of freshly picked peas for immediate snacking. My little ones love peas as much as I do, so I strategically placed them in the box closest to our outdoor play area. That way, anytime we want a snack, it is only a few feet away from us.
 From the beginning, my little ones and I, have kept a close eye on our peas, anticipating that first taste. Any peas we don’t eat, we pick and freeze for future meals. Once the peas are all eaten and harvested, I then pull the plants out. They will no longer produce anymore for the season. I will keep that space open, because I will reseed more peas in mid August to have a Fall Batch.
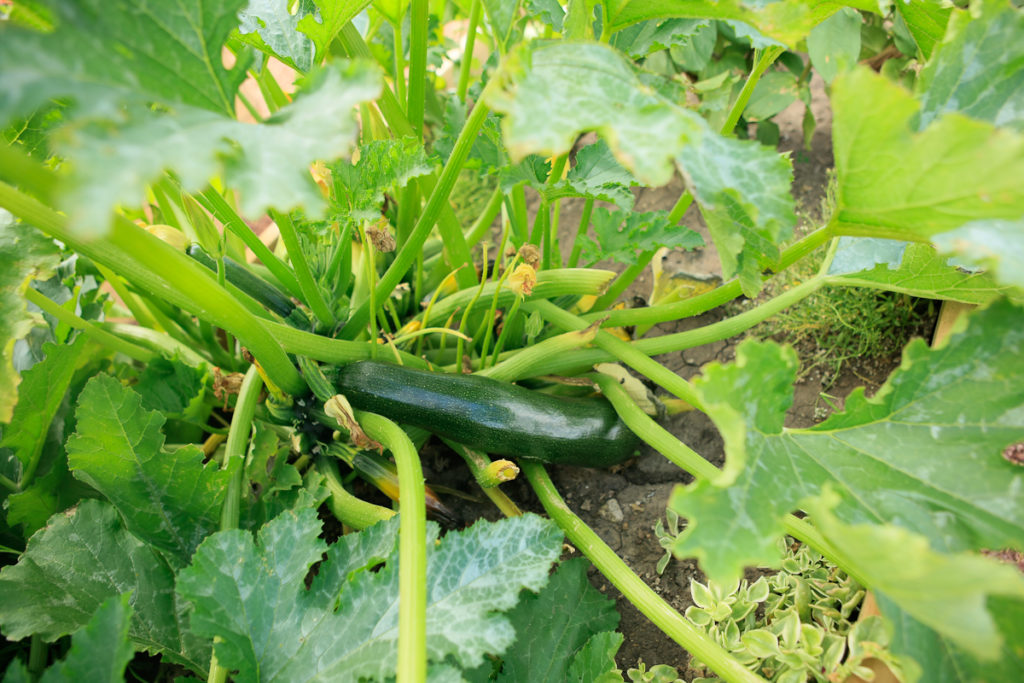 Since Zucchini produces so much from just one mound, I only seeded 2 mounds this year. Each mound had 3 seeds in it. It is Zucchini season now, and we have found that 2 mounds is the perfect amount for our family. We eat them fresh and I also freeze them for future meals, such as Zucchini Pizza, (recipe coming soon).
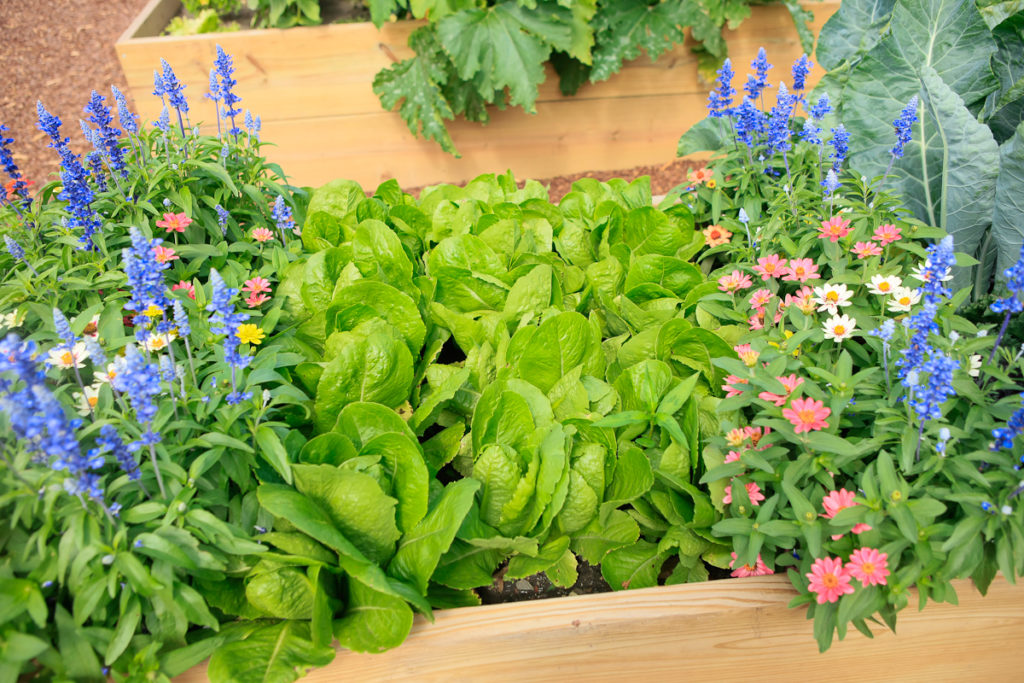
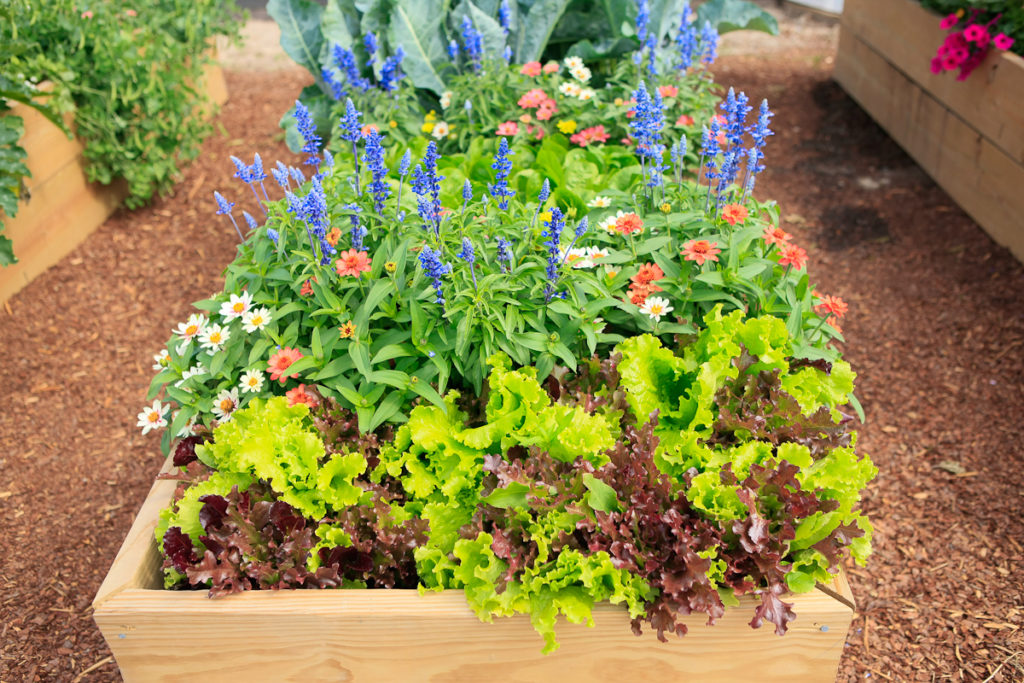
Here is the last raised bed. This bed includes Pickles, Celery, Cauliflower, 2 Varieties of Lettuce and Flowering Annuals.
 This variety of lettuce shown is called, Green Towers. This is my first time growing it, and I find it to be similar in growth habit to Romaine Lettuce. The taste is in between Romaine and Head Lettuce. I cut a couple bundles at a time. I will eat them right away, and the rest I chop and store in the fridge for later use. So far they have stayed very nice while I just cut as needed. Once they are cut, they are all done.
The Lettuce in this image is called, Salad Bowl Mix. The taste reminds me of Spring Mix Lettuce. It is very good tasting and stays nice after being chopped and stored in the fridge. The only thing I do to maintain this lettuce is water almost daily, but water very lightly. You also have to chop it as soon as it is ready to eat, like in the picture. Once you chop it, it continues to grow and provides fresh Lettuce for you all season long!
Here are my celery plants. What can I say? They are doing amazing! Once you are standing near this box, you don’t even have to look at it to know that Celery is growing there. The smell is just fantastic! In the beginning of the season, the leaves were extremely yellow. I have no idea why, but they luckily worked out their issue on their own, and are now thriving. My only guess would be the really cool spring nights, or just the adjustment of being taken out of their pack, and being replanted. If that would have continued, I would have called Farmer Wayne to the rescue. Vining on the end of the raised bed, are my Pickles. I planted just 1 pickle plant on a “hill”. (A hill planting, is just a small mound of dirt surrounding the newly planted plant. This is required for a few edible varieties such as, Pickles, Zucchini and Cucumbers.) Today was the first day that I picked 2 pickles off of this plant. I know that it is just the beginning, because this plant is loaded with little yellow flowers. (The yellow/white flowers on your vegetable/fruit plants, are where your vegetables/fruits will form.) This Pickle plant tried to vine all over everything, so I had to train it to grow around other plants. (Training your vine just means, moving the vine to where you want it to grow and expand.)
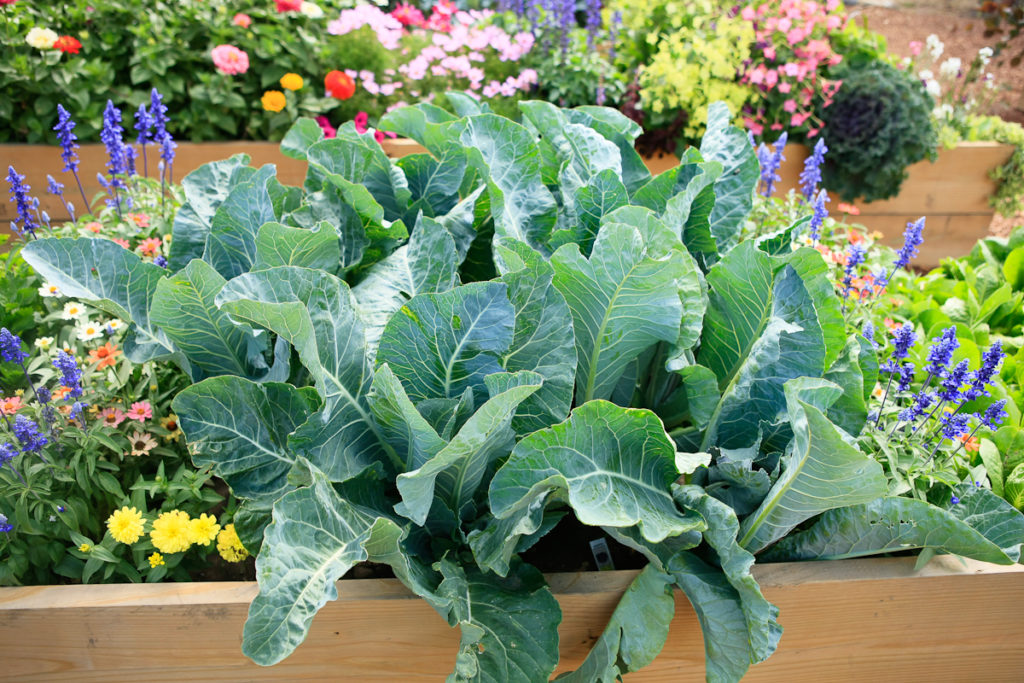 The Cauliflower is right on schedule. It is low maintenance, and ready to provide great snacking and meals. I planted quite a bit of Cauliflower this year because I plan on freezing quite a bit for future meals. This year, I didn’t just plant your traditional white Cauliflower, I planted a NEW variety called, Graffiti.
 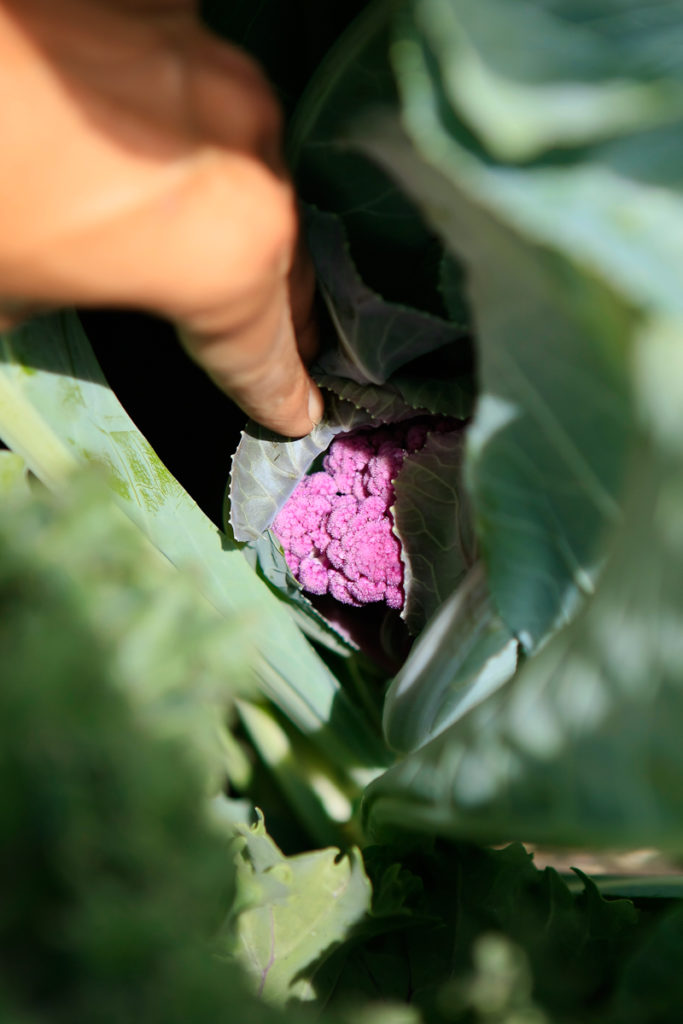 When I saw a picture of it, I didn’t believe it.
It was the most perfect color purple I have ever seen, so I thought, why not give it a try. Sure enough, the other day, I was walking past this bed. The cauliflower plants were shadowed, but just one small ray of sunshine brightened up something that caught my eye. There it was. In the middle of the Cauliflower. Something purple. It was the most beautiful purple Cauliflower I have ever seen! Once this is ready to harvest, I will then let you know how it tastes. They say that it has more health benefits than the traditional white Cauliflower.

 My favorite time during the day, in the Garden Oasis, is nightfall. The colors of everything in the garden are just so much more vibrant. The air is still, and has a lingering smell of fresh cut lawn and winter wheat that covers the fields surrounding. The crickets are chirping so loud, it sounds like they are having their nightly celebration during the summer season. Loud bull frogs are cheering from the water way as the fire flies light up the sky. Every once in awhile you get just a whiff of the sweet smell of snap dragons, sweet alyssum and stock, mixed with the scent of fresh pine mulch. While all of this is going on around me, I am just sitting on my porch steps with my husbands hand in mine, my little girls on our laps, snacking on my homegrown veggies. I take all of this in while looking up at the half lit sky that is blue and purple, with pink and orange streaks in the falling horizon. I just think to myself, ‘Nothing is better than this’. ‘Nothing’.
If you enjoyed this article, please subscribe so you can enjoy more future articles like this one. Thank you so much for reading. I hope I have taught you something you never knew before!
Article Coming Soon, ‘The Fall Garden’
Featuring my 40’x70′ ground bed