


The Chronicles of Casa de Lawrence, Part 1, The Raised Bed Wing PLUS My Garden Journal
My dream, for as long as I could remember, was to have a huge garden of my own. Not just any garden, but an entire garden landscape that stretches over 5 open acres. I want you to join me in my journey through out many years to come. This isn’t a 2-3 year project. This is my lifetime goal, and your lifetime garden lesson. By the time I have grandkids, I want them to beg to come over just to walk through grandma and grandpas gardens.
 Where does this dream stem from, you ask? Let me start from the beginning.
Growing up on a farm and helping in the fields pick vegetables, was never something I was enthused about. I was never that one of a kind child that jumped up and down, and darted as quick as I could to get my laces tied up. I never ran out the door excited anytime my mom or dad would tell me it was time to work. I was just like any other kid. I’d moan and groan, sometimes even stomp my feet all the way to the job site. I may not have loved it then, but boy am I thankful for that background now. So thank you, Mom and Dad. Without their ambition and vision for the financial future of our family, I may never have been brought up with all of the knowledge I obtain today.
Growing up in the family I did definitely gave me an advantage at being great at a lot of things today. For one, I am not lazy! That goes a long way these days.
Second, I have one of the greenest thumbs out there. For instance, anytime I grow anything for the first time, it turns out to look like something I’ve grown for years.
Third, I’m amazing at cooking with all natural ingredients, due to the fact we could only afford to eat what we grew  growing up. Except for pasta. You can’t have an Italian mother and no pasta. There was always cash for that, but you better believe my mother would be making her own sauce. The look on her face, still today, when I tell her I bought my sauce; YIKES!
Fourth, my people skills, so I have been told. I guess you just acquire this skill if you have been working with customers since the day you could walk. My mom is a very talkative person. She is the type of person that people will say hi to, and then tell her their whole life story. Down to every last dirty detail. It’s quite magical. I’ve seen this first hand. My dad, now he likes to act non social. He always says he could live in a cabin in the woods and not have anyone around and be fine. Then, you get this guy around people, and he’s like an old wash woman. If you ever get in a conversation with him, feel lucky, because he is one of the most knowledgeable growers I know. So my people skills are very rounded, due to the social differences amongst my parents.

The one thing I am the most thankful for is my green thumb. I have always been a great grower, but it wasn’t until I was married and had my own yard, that I realized I have a VERY green thumb. I’d go as far as calling it forest green. As the years have gone on, I have come to the conclusion, that I have been given such an amazing gift, and I have to share it with others. That is my goal. To help others take their brown thumbs and turn them green. Once your thumb goes green, you see the world in a whole new way.
I want to take you on my journey through the tests and trials of every type of gardening you can possibly put on 5 acres. What I am trying to accomplish, is for you to learn from my successes and mistakes. I am not new to gardening, obviously, but I am starting all of my gardens from scratch. My husband and I built our ‘forever home’ in an open field. Now it’s time for my designer side to kick in and create the yard of my dreams, that will take me a lifetime. If you are reading this now, you are following an amazing and beautiful journey from the beginning. You will learn about everything I grow, and everything I create. This way, you will feel confident in doing some of your own projects by having the knowledge that I will be sharing with you along the way through ‘The Chronicles of Casa de Lawrence’.
Outdoor Project 1
The Raised Bed Wing

The key to a lifetime project is patience and help. I’m not usually a patient person, but with this particular project, I feel more at ease and relaxed than anything I have ever done. I think it is mostly due to the fact that I am doing what I love, and receiving help from those I love.  Without my other half, my husband, none of this would have been possible. He really understood my vision and helped me with the things I couldn’t do alone. Even the kiddos were a part of the project. It will be a memory that will pop up every time I think about this project, and it will make me smile.
There are many factors that play a role in this whole design. The main factor being, the lay out had to be set up to accept an expansion over time. That expansion would include a large potting bench, a greenhouse, a small potting shed and more raised gardens for fresh food. Before starting a large project, always consider the factors into your design from the beginning. It will make the finish so much easier and attainable.
At the end of this article, I will include a list of everything I have planted/seeded so far. This article will be updated throughout the growing season, due to my garden journal that I will be sharing with you all season!
 I have a huge list of my lifetime garden projects, and this year, we decided to mainly focus on one. The Raised Bed Wing. The reason we decided on this project, as a family, is because this project will give the most back. Fresh food! I’m not just talking about a little bit of fresh food for some of our summer meals. I’m talking the big Shebang! Enough food for meals, but also for canning and freezing so we have it to last us through all of the seasons. If the food we harvest doesn’t last us through winter, then guess what? We are going to have to expand our growing space next year, because what I hate most, is spending all kinds of money on fresh food that doesn’t taste fresh. If you have ever grown your own food, you will know what I’m talking about. No fresh food, tastes like homegrown fresh food.
 On our south side of the house was just another boring old grass area. It was last summer, when I stood out on that boring old grass patch, that I decided I was going to make that area my garden oasis. It was a beautiful sunny evening, around 6pm, when the sun has that hot dreamy glow. The birds were chirping, the light warm breeze blew through my hair, and I closed my eyes. I wanted to envision that area. It is hot and sunny at all times, except early morning. Then, BOOM! There it was. A vision. I get these a lot when it comes to designing, and when I get them, it’s like magic. I foresaw the whole area as my garden oasis, The Raised Bed Wing. I started drawing it up and put it in my project folder, and this year, it was the wild card.
 Last summer we had a few big trees brought out to the yard, just so we had a few anchors in the foundation for future design. One day, my husband told me that there were two very large pines that were going to be arriving at Casa de Lawrence. He asked me, ‘Do you have any ideas on where you want to put them?’ I closed my eyes in hope of another amazing vision idea, and once again, I was not disappointed. I envisioned the two large pines as my entry anchors when entering The Raised Bed Wing.
We placed a big pine on each side of the garden entry, which at the time was just that boring old grass patch. 

 This year, when the time came to create the area, it was so nice having that plan and idea all ready to go. We had to start by scraping all the lawn down to dirt. Then, we put a full gravel path running through the middle of the garden area. We made sure the path was nice and wide. This way, for future projects, the path would be wide enough for large trucks to use. This pathway has been used a lot in the last week, due to another project in the making, our Sledding Hill and Nature Landing. I’ll go more into that in future articles on, ‘The Chronicles of Casa de Lawrence’.
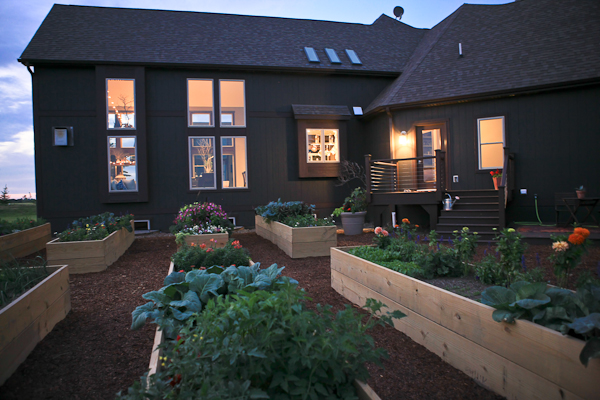
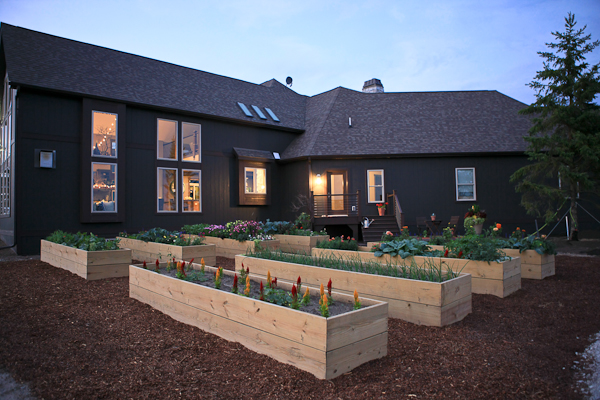
Once the pathway was in, that’s when we were able to start building the raised beds. We knew we couldn’t take on this part of the project alone, so we called in an amazing carpenter, Forest Norton. The beds are built to perfection, and they are built to last. The raised bed dimensions are 3’Wx14’Lx2’H. I already foresee us adding more, and I foresaw us adding more before we even started. So when I designed this area, it was designed for expansion.
On the other side of the pathway, opposite the raised beds, is a ground bed. The dimensions of this bed are  35’Wx70’L. This garden will be dedicated mainly to my fun fall crops such as pumpkins, gourds and indian corn. A good portion of this garden will also host my berry patch and anything else that I couldn’t fit into my raised beds. Below I have included my garden journal, which has a list of items that I have either planted or seeded so far. There will be more to come because I am not finished planting, and I don’t start seeding pumpkins for another couple weeks. This article will constantly be updated, due to my garden journal. It will be a great reference for you during your growing season. I will also provide updated photos throughout this project, in this article. So check back soon!

Before
Almost After. Finished Photo coming soon!


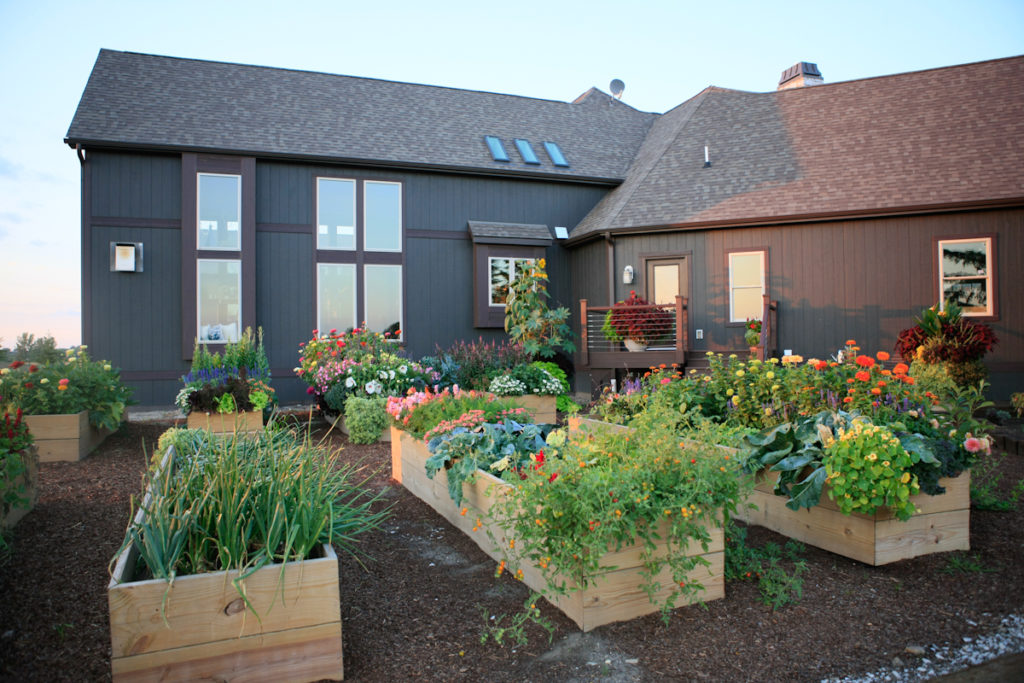
Want to see more Images of the Garden Oasis Gardens from 2016? Then check out this other article, by clicking on it: The ‘End of Season’ Gardens 2016
The Garden Diaries 2016
Raised Beds:
Strawberries-
May 13, Planted plants in one box. Total blonde moment. Should have planted them in the ground so they can have the best chance of coming back next season. I will replant those at a later date in the ground.
Onions-
May 13, Planted my onions. Dad said he usually plants them the first week of May. We will see how they do and when they produce this year. I can always plant them earlier next season. I planted them 4 inches apart with no rows since I planted them in a raised bed. I planted yellow spanish, walla walla, red, and white.
Peas-
May 13, Seeded my peas today even though they should have been in a couple weeks ago. Put 1 seed per hole and spaced the holes 2 inches apart in a 3×3 section. My gardens weren’t ready to plant in, so I had to suck it up and plant late. We will see how the batch turns out. I planted sugar snap and green arrow peas. Dad planted peas for me in his garden 2 weeks ago, so I only planted mini patches so we could just use ours to snack on while playing outside. Lana and I love peas so I have to freeze a lot of them to hold us over the winter.
May 23- Both pea varieties are sprouting green today. I am so excited!

Zucchini-
May 13, Seeded my Zucchini. created 2 mounds in a 4×3 area of my raised bed. Placed them with a foot between them. Put 3-4 seeds per mound. We will see how that works out.
May 23, 1 mound has sprouted 1 green sprout.

Head Lettuce-
May 13, Seeded my head lettuce. Placed them in a 1×3 area. Made 3 holes, each having 1 foot of space for growth. Placed 6 seeds per hole. This may be too many, but I can always separate out the plants once they grow up.
Lettuce Bowl Lettuce-
May 21, Seeded. Placed them in a 1’ x 3′ area. Made small shallow trenches, 3” apart, placed 1 seed per every 2 inches. This is the kind of lettuce my family seeds into, what they call, Lettuce Bowls. They sell these at the greenhouse. I’m going to test out the flavor of this lettuce.
Lettuce, Green Towers
May 21, Seeded. Placed them in a 3’x3’ area. Made 12 mini mounds, 5 seeds per mound. My dad, Farmer Wayne, told me that ‘Green Towers Lettuce’ is similar to Romain lettuce in the shape it forms when it is grown. So we will find out. I can’t wait to see what it tastes like. If it is anything like Romaine Lettuce, then I will be sold on it.
Cauliflower, ‘White’ and ‘Graffitti’ Varieties
May 21, Planted plants. Place them about 10” apart in a 3’x4’ area (Fit 8 plants). They are suppose to be planted further apart, but with raised bed gardening, things are done a little differently compared to ground bed gardening. We will see if planting them that close affects their yield. I love Cauliflower, so when I saw that my dad, Farmer Wayne, was now seeding a a purple cauliflower (Graffitti), I had to get it and try it out. I like to eat it fresh, and I also love to freeze it for quick meals or for my famous homemade soups!
Celery
May 21, Planted plants. Placed them in a 3’x3’ area and placed the plants 6” apart(Fit 16 plants by staggering). I’m not a huge celery fan when it comes to eating it raw. I like to chop and freeze my celery so I can just toss it in to homemade soup in the crock pot. Celery is the main ingredient for many of my homemade soups.
Bush Pickle
May 21, Planted plant. Planted 1 plant on a mound in a 3’x3’ area. This might be a tight space for it, but we will find out. I wanted to seed my own bush pickles this year, but I feel a bit behind, due to the garden project. So I decided to use a plant instead, seeded by my dad, Farmer Wayne. He feels you get more of a yield from seeding, over planting plants. We will see. He seeded, I planted. I will compare.
Brussel Sprouts
May 21, Planted plants. Placed them in a 3’x4’ area, spaced 1’ apart(Fit 12 plants). I sure hope these do well because I love me some bacon sprouts! I make a mean dish! My mom cans the brussels, but I freeze them. They are great fresh, but I can’t always keep up with the yield.
Broccoli-
May 21, Planted plants. Placed them in a 3’x4’ area, spaced 1’ apart (fit 9 plants). I LOVE Broccoli. Fresh or cooked, serve it up! I freeze lots of broccoli, and even still, mid winter, I have to start buying it in the store. It never tastes as good. I love broccoli in my soups, or cooked on the stove top with a little coconut oil and parmesan cheese over top of homemade fettucini and farm raised chicken strips.
Peppers-
May 21, Planted plants.
Hot peppers- Jalapeño, peppercinis. Placed in a 3’x3’ area (fit 9 plants). Placed ‘Red Lace Salvia’ around them so we know those are the hot peppers. My husband loves hot peppers, me, I can’t tolerate them. A little jalapeño in mexican food is good, but only at a medium level. Otherwise my mouth is on fire. This year, I plan on canning these hot peppers for my husband, since he is such a dear.
Red Knight, Admiral Pepper (large red and yellow peppers). Place in a 2’x3’ area (fit 8 plants). I love these peppers for homemade pizzas, and my famous ‘Italian Pepper Bowl’ dish. I use them fresh and I also chop and freeze them. When frozen, they give off such a great flavor atop a homemade pizza, because by freezing them, they soften up a bit more when cooked.
Lunchbox Peppers (small, sweet yellow, red and green peppers). Placed in a 1’x2’ area (fit 4 plants). These are great for all of the above. The pro to growing these little guys, is you have no pepper waste, and they are great for just picking and snacking. My little Lana just loves these little guys.
Carrots-
May 21st, seeded in a 3×3 area. Made shallow trenches, 3” apart and dropped a seed every 2-3 inches. I love carrots for smoothies and for chopping in fresh salads. I also love chopping and freezing these guys for my soups and crock pot roasts.
Cucumber-
May 21, Planted 1 plant and mounded the area it was planted in. One plant should yield enough for us. We can only keep up with the yield of one plant, since they taste the best fresh.
Tomatoes-
May 21,
Early Girl, Planted 1 plant 1’x3’ area. These are larger slicers.
Red Cherry Large, Planted 1 plant, 2’x1 1/2’ area. These are the little cherry tomatoes.
Sunsugar, Planted 1 plant, 2’x1 1/2’ area. These are the little yellow cherry tomatoes. They are said to be even sweeter than the Sweet Million.
I planted these all pretty close together, but I’m going to let them trail over the side of my 2’ high raised beds. I just want them to go wild, and we will see how they do. I used to plant a lot more tomatoes and can all of my own homemade pizza sauce, but I felt I had to cut back on something this year. With my family growth this year (another new baby addition, Sayla Bay), I only have so much time.
Cabbage-
May 21, planted plants in a 3’x3’ area (fit 8 plants). (4)Red and (4)green cabbage. Love this stuff for my homemade coleslaw, and sautéing to garnish over my wild rice dish. My mom makes a lot of suer kraut with her cabbage, then freezes it. So that’s one less thing I have to do because I make a mean Reuben dip for my honey, it’s his favorite.
Spinach-
May 21, Seeded In a 2’x3’ area. Dug shallow tranches 2” apart. Sprinkled seed in. I may have used too much seed, but I wanted to use all the seed I had, so I seeded it pretty thick. We will see if this is a problem. If so, I will have learned my lesson. We eat a lot of spinach in our smoothies. Whatever we have left over, I will freeze because my family love my homemade spinach dip.
Herbs-
May 21, Seeded. Created small trenches, 2” apart. Just sprinkle seed in.
Cilantro, Stevia, Parsley, Basil
I know I didn’t do many herbs, for a girl who loves to cook. My problem is, every year, I plant or seed all of these herbs, and end up with a lot of waste. So my goal this year, was to just seed the main herbs I use almost every day. I will use them fresh, and I will be drying them and packaging them for use during the winter months. If I feel that the hard work paid off, then I will add more varieties next year.