


I just made this with my little ones, and it was a hit!
So, I was on Pinterest, like most of us always are, and typed in ‘Easter Crafts for Kids’. What popped up was a cute little carrot project. Little Lana said, “Mom, I want to make those carrots.” I thought it was an ok project, but then my mind started wandering, and that’s when I thought, ‘Lets take this craft one step further’. This Easter Craft quickly became a Spring/Summer Craft. That’s how my DIY Carrot Sign got created.
What you need:
- White Card stock Paper
- Orange Washable Paint
- Green Construction Paper
- Glue or Hot Glue Gun
- Scissors
- Cardboard
- Black Acrylic Paint
- White Chalk Board Marker
- Jute Rope
- Popsicle Sticks
This project wasn’t an all at once project. Which I felt was great for young children since they always seem to get bored quickly. So in the morning we did step one, and in the afternoon we did step 2.
Here are Step by Step Instructions:
-
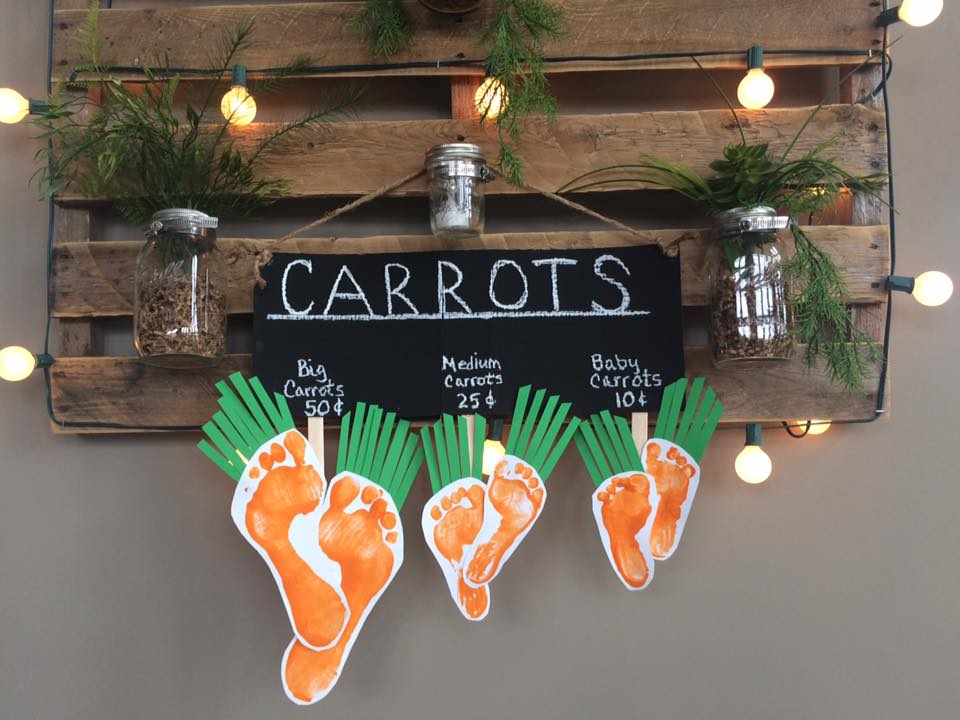
Take Cardboard and cut out a rectangular shape. Paint it black with Acrylic Paint. Then just let it dry. Take an old piece of cardboard or thick stock paper and pour washable orange paint on it. Then dip a foot in it. Then stamp the foot onto thick white card stock paper. Be sure to keep a towel nearby. It would be unfortunate if a little one decided that-that was the time to take off and run through the house. As soon as that foot gets stamped on paper, be sure to wrap it up with a towel and bring them to the nearest sink or tub to rinse their foot off. If you use washable paint, then you will have no trouble getting this paint off of their feet. Then, we just let the painted foot prints dry. You can either call it a wrap for the day, or continue the project later that afternoon. If you didn’t come prepared with a towel, then I’m sure you ended up calling it a day.
- Now we are moving on to the second half of the project. Using kid safe scissors, let the kids help cut out their own feet. You may want to assist with this, because kids tend to cut and tear all at the same time, and you don’t want to have to redo step 1.
- Give your kids, kid safe scissors and green paper. Let them cut and tear, while you cut nice straight strips of green paper.
- Let the kids glue the green strips of paper onto the back of the foot. Then collect their Project, and straighten out the green strips. Then finish it off with some hot glue so you aren’t waiting all night for those to dry.
- Take the card board you painted black, and write something cute with a white chalk board marker.
- Then, arrange the feet in pairs, and hot glue them together.
- Grab your popsicle sticks and use these to attach the ‘Carrot Feet’ to the card board sign with hot glue.
-
Last, take just rope and cut it accordingly. Knot each end just for looks, then hot glue it to the cardboard sign.
There you have it. All the kids have to do is stamp, cut, tear and glue. So pretty much, what I’m saying is, hope you like crafts!
If you liked this DIY article, you may like this one:
Easy. Fun. DIY Picture Frame Ornament
Feel free to: SUBSCRIBE HERE